Simple Text Viewer Example
Using Qt Assistant as a customized help viewer for your application.
This example shows how to use Qt Assistant as a customized help viewer in a custom application. This is done in two stages. Firstly, documentation is created and Qt Assistant is customized; secondly, the functionality to launch and control Qt Assistant is added to the application.
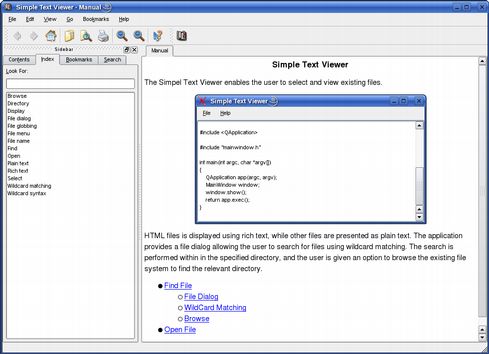
The Simple Text Viewer application lets the user select and view existing files. The application provides its own custom documentation that is available from the Help menu in the main window's menu bar or by clicking the Help button in the application's find file dialog.
The example consists of four classes:
Assistantprovides functionality to launch Qt Assistant.MainWindowis the main application window.FindFileDialogallows the user to search for files using wildcard matching.TextEditprovides a rich text browser that makes sure that images referenced in HTML documents are displayed properly.
Note: We will only comment on the parts of the implementation that are relevant to the main issue, that is making Qt Assistant act as a customized help viewer for our Simple Text Viewer application.
Creating Documentation and Customizing Qt Assistant
How to create the actual documentation in the form of HTML pages is not in the scope of this example. In general, HTML pages can either be written by hand or generated with the help of documentation tools like qdoc or Doxygen. For the purposes of this example we assume that the HTML files have already been created. So, the only thing that remains to be done is to tell Qt Assistant how to structure and display the help information.
Organizing Documentation for Qt Assistant
Plain HTML files only contain text or documentation about specific topics, but they usually include no information about how several HTML documents relate to each other or in which order they are supposed to be read. What is missing is a table of contents along with an index to access certain help contents quickly, without having to browse through a lot of documents in order to find a piece of information.
To organize the documentation and make it available for Qt Assistant, we have to create a Qt help project (.qhp) file. The first and most important part of the project file is the definition of the namespace. The namespace has to be unique and will be the first part of the page URL in Qt Assistant. In addition, we have to set a virtual folder which acts as a common folder for documentation sets. This means, that two documentation sets identified by two different namespaces can cross reference HTML files since those files are in one big virtual folder. However, for this example, we'll only have one documentation set available, so the virtual folder name and functionality are not important.
 <?xml version="1.0" encoding="UTF-8"?>
 <QtHelpProject version="1.0">
   <namespace>org.qt-project.examples.simpletextviewer</namespace>
   <virtualFolder>doc</virtualFolder>
The next step is to define the filter section. A filter section contains the table of contents, indices and a complete list of all documentation files, and can have any number of filter attributes assigned to it. A filter attribute is an ordinary string which can be freely chosen. Later in Qt Assistant, users can then define a custom filter referencing those attributes. If the attributes of a filter section match the attributes of the custom filter the documentation will be shown, otherwise Qt Assistant will hide the documentation.
Again, since we'll only have one documentation set, we do not need the filtering functionality of Qt Assistant and can therefore skip the filter attributes.
Now, we build up the table of contents. An item in the table is defined by the section tag which contains the attributes for the item title as well as link to the actual page. Section tags can be nested infinitely, but for practical reasons it is not recommended to nest them deeper than three or four levels. For our example we want to use the following outline for the table of contents:
- Simple Text Viewer
- Find File
- File Dialog
- Wildcard Matching
- Browse
- Open File
- Find File
In the help project file, the outline is represented by:
 <filterSection>
   <toc>
     <section title="Simple Text Viewer" ref="index.html">
       <section title="Find File" ref="findfile.html">
         <section title="File Dialog" ref="filedialog.html"/>
         <section title="Wildcard Matching" ref="wildcardmatching.html"/>
         <section title="Browse" ref="browse.html"/>
       </section>
       <section title="Open File" ref="openfile.html"/>
     </section>
   </toc>
After the table of contents is defined, we will list all index keywords:
 <keywords>
   <keyword name="Display" ref="index.html"/>
   <keyword name="Rich text" ref="index.html"/>
   <keyword name="Plain text" ref="index.html"/>
   <keyword name="Find" ref="findfile.html"/>
   <keyword name="File menu" ref="findfile.html"/>
   <keyword name="File name" ref="filedialog.html"/>
   <keyword name="File dialog" ref="filedialog.html"/>
   <keyword name="File globbing" ref="wildcardmatching.html"/>
   <keyword name="Wildcard matching" ref="wildcardmatching.html"/>
   <keyword name="Wildcard syntax" ref="wildcardmatching.html"/>
   <keyword name="Browse" ref="browse.html"/>
   <keyword name="Directory" ref="browse.html"/>
   <keyword name="Open" ref="openfile.html"/>
   <keyword name="Select" ref="openfile.html"/>
 </keywords>
As the last step, we have to list all files making up the documentation. An important point to note here is that all files have to listed, including image files, and even stylesheets if they are used.
     <files>
       <file>browse.html</file>
       <file>filedialog.html</file>
       <file>findfile.html</file>
       <file>index.html</file>
       <file>intro.html</file>
       <file>openfile.html</file>
       <file>wildcardmatching.html</file>
       <file>images/browse.png</file>
       <file>images/fadedfilemenu.png</file>
       <file>images/filedialog.png</file>
       <file>images/handbook.png</file>
       <file>images/mainwindow.png</file>
       <file>images/open.png</file>
       <file>images/wildcard.png</file>
     </files>
   </filterSection>
 </QtHelpProject>
The help project file is now finished. If you want to see the resulting documentation in Qt Assistant, you have to generate a Qt compressed help file out of it and register it with the default help collection of Qt Assistant.
 qhelpgenerator simpletextviewer.qhp -o simpletextviewer.qch
 assistant -register simpletextviewer.qch
If you start Qt Assistant now, you'll see the Simple Text Viewer documentation beside the Qt documentation. This is OK for testing purposes, but for the final version we want to only have the Simple Text Viewer documentation in Qt Assistant.
Customizing Qt Assistant
The easiest way to make Qt Assistant only display the Simple Text Viewer documentation is to create our own help collection file. A collection file is stored in a binary format, similar to the compressed help file, and generated from a help collection project file (*.qhcp). With the help of a collection file, we can customize the appearance and even some functionality offered by Qt Assistant.
At first, we change the window title and icon. Instead of showing "Qt Assistant" it will show "Simple Text Viewer", so it is much clearer for the user that the help viewer actually belongs to our application.
 <?xml version="1.0" encoding="UTF-8"?>
 <QHelpCollectionProject version="1.0">
 <assistant>
     <title>Simple Text Viewer</title>
     <applicationIcon>images/handbook.png</applicationIcon>
     <cacheDirectory>QtProject/SimpleTextViewer</cacheDirectory>
The cacheDirectory tag specifies a subdirectory of the users data directory (see the Qt Help Collection Files) where the cache file for the full text search or the settings file will be stored.
After this, we set the page displayed by Qt Assistant when launched for the very first time in its new configuration. The URL consists of the namespace and virtual folder defined in the Qt help project file, followed by the actual page file name.
<startPage>qthelp://org.qt-project.examples.simpletextviewer/doc/index.html</startPage>
Next, we alter the name of the "About" menu item to "About Simple Text Viewer". The contents of the About dialog are also changed by specifying a file where the about text or icon is taken from.
 <aboutMenuText>
     <text>About Simple Text Viewer</text>
 </aboutMenuText>
 <aboutDialog>
     <file>about.txt</file>
     <icon>images/icon.png</icon>
 </aboutDialog>
Qt Assistant offers the possibility to add or remove documentation via its preferences dialog. This functionality is helpful when using Qt Assistant as the central help viewer for more applications, but in our case we want to actually prevent the user from removing the documentation. So, we hide the Documentation tab in the Preferences dialog.
Since the address bar is not really relevant in such a small documentation set we switch it off as well. By having just one filter section, without any filter attributes, we can also disable the filter functionality of Qt Assistant, which means that the filter page and the filter toolbar will not be available.
     <enableDocumentationManager>false</enableDocumentationManager>
     <enableAddressBar>false</enableAddressBar>
     <enableFilterFunctionality>false</enableFilterFunctionality>
 </assistant>
For testing purposes, we already generated the compressed help file and registered it with Qt Assistant's default help collection. With the following lines we achieve the same result. The only and important difference is that we register the compressed help file, not in the default collection, but in our own collection file.
   <docFiles>
     <generate>
         <file>
             <input>simpletextviewer.qhp</input>
             <output>simpletextviewer.qch</output>
             </file>
         </generate>
     <register>
         <file>simpletextviewer.qch</file>
         </register>
     </docFiles>
 </QHelpCollectionProject>
As the last step, we have to generate the binary collection file out of the help collection project file. This is done by running the qhelpgenerator tool.
qhelpgenerator simpletextviewer.qhcp -o simpletextviewer.qhc
To test all our customizations made to Qt Assistant, we add the collection file name to the command line:
assistant -collectionFile simpletextviewer.qhc
Controlling Qt Assistant via the Assistant Class
We will first take a look at how to start and operate Qt Assistant from a remote application. For that purpose, we create a class called Assistant.
This class provides a public function that is used to show pages of the documentation, and one private helper function to make sure that Qt Assistant is up and running.
Launching Qt Assistant is done in the function startAssistant() by simply creating and starting a QProcess. If the process is already running, the function returns immediately. Otherwise, the process has to be set up and started.
 bool Assistant::startAssistant()
 {
     if (m_process.isNull()) {
         m_process.reset(new QProcess());
         QObject::connect(m_process.data(),
                          QOverload<int, QProcess::ExitStatus>::of(&QProcess::finished),
                          m_process.data(), [this](int exitCode, QProcess::ExitStatus status) {
                              this->finished(exitCode, status);
                          });
     }

     if (m_process->state() != QProcess::Running) {
         QString app = QLibraryInfo::location(QLibraryInfo::BinariesPath);
 #ifndef Q_OS_DARWIN
         app += QLatin1String("/assistant");
 #else
         app += QLatin1String("/Assistant.app/Contents/MacOS/Assistant");
 #endif

         const QString collectionDirectory = documentationDirectory();
         if (collectionDirectory.isEmpty()) {
             showError(tr("The documentation directory cannot be found"));
             return false;
         }

         QStringList args{QLatin1String("-collectionFile"),
                          collectionDirectory + QLatin1String("/simpletextviewer.qhc"),
                          QLatin1String("-enableRemoteControl")};

         m_process->start(app, args);

         if (!m_process->waitForStarted()) {
             showError(tr("Unable to launch Qt Assistant (%1): %2")
                               .arg(QDir::toNativeSeparators(app), m_process->errorString()));
             return false;
         }
     }
     return true;
 }
To start the process we need the executable name of Qt Assistant as well as the command line arguments for running Qt Assistant in a customized mode. The executable name is a little bit tricky since it depends on the platform, but fortunately it is only different on macOS.
The displayed documentation can be altered using the -collectionFile command line argument when launching Qt Assistant. When started without any options, Qt Assistant displays a default set of documentation. When Qt is installed, the default documentation set in Qt Assistant contains the Qt reference documentation as well as the tools that come with Qt, such as Qt Designer and qmake.
In our example, we replace the default documentation set with our custom documentation by passing our application-specific collection file to the process's command line options.
As the last argument, we add -enableRemoteControl, which makes Qt Assistant listen to its stdin channel for commands, such as those to display a certain page in the documentation. Then we start the process and wait until it is actually running. If, for some reason Qt Assistant cannot be started, startAssistant() will return false.
The implementation for showDocumentation() is now straightforward. Firstly, we ensure that Qt Assistant is running, then we send the request to display the page via the stdin channel of the process. It is very important here that the command is terminated by an end of line token to flush the channel.
 void Assistant::showDocumentation(const QString &page)
 {
     if (!startAssistant())
         return;

     QByteArray ba("SetSource ");
     ba.append("qthelp://org.qt-project.examples.simpletextviewer/doc/");

     m_process->write(ba + page.toLocal8Bit() + '\n');
 }
Finally, we make sure that Qt Assistant is terminated properly in the case that the application is shut down. The destructor of QProcess kills the process, meaning that the application has no possibility to do things like save user settings, which would result in corrupted settings files. To avoid this, we ask Qt Assistant to terminate in the destructor of the Assistant class.
 Assistant::~Assistant()
 {
     if (!m_process.isNull() && m_process->state() == QProcess::Running) {
         QObject::disconnect(m_process.data(),
                             QOverload<int, QProcess::ExitStatus>::of(&QProcess::finished),
                             nullptr, nullptr);
         m_process->terminate();
         m_process->waitForFinished(3000);
     }
 }
MainWindow Class
The MainWindow class provides the main application window with two menus: the File menu lets the user open and view an existing file, while the Help menu provides information about the application and about Qt, and lets the user open Qt Assistant to display the application's documentation.
To be able to access the help functionality, we initialize the Assistant object in the MainWindow's constructor.
 MainWindow::MainWindow()
 {
     assistant = new Assistant;
     ...
 }
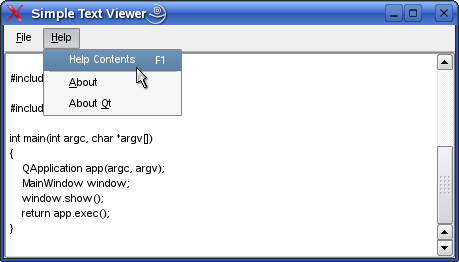
Then we create all the actions for the Simple Text Viewer application. Of special interest is the assistantAct action accessible via the F1 shortcut or the Help > Help Contents menu item. This action is connected to the showDocumentation() slot of the MainWindow class.
 void MainWindow::createActions()
 {
     assistantAct = new QAction(tr("Help Contents"), this);
     assistantAct->setShortcut(QKeySequence::HelpContents);
     connect(assistantAct, &QAction::triggered, this, &MainWindow::showDocumentation);
     ...
 }
In the showDocumentation() slot, we call the showDocumentation() function of the Assistant class with the URL of home page of the documentation.
 void MainWindow::showDocumentation()
 {
     assistant->showDocumentation("index.html");
 }
Finally, we must reimplement the protected QWidget::closeEvent() event handler to ensure that the application's Qt Assistant instance is properly closed before we terminate the application.
 void MainWindow::closeEvent(QCloseEvent *)
 {
     delete assistant;
 }
FindFileDialog Class

The Simple Text Viewer application provides a find file dialog allowing the user to search for files using wildcard matching. The search is performed within the specified directory, and the user is given an option to browse the existing file system to find the relevant directory.
In the constructor we save the references to the Assistant and QTextEdit objects passed as arguments. The Assistant object will be used in the FindFileDialog's help() slot, as we will see shortly, while the QTextEdit will be used in the dialog's openFile() slot to display the chosen file.
 FindFileDialog::FindFileDialog(TextEdit *editor, Assistant *assistant)
     : QDialog(editor)
 {
     currentAssistant = assistant;
     currentEditor = editor;
     ...
 }
The most relevant member to observe in the FindFileDialog class is the private help() slot. The slot is connected to the dialog's Help button, and brings the current Qt Assistant instance to the foreground with the documentation for the dialog by calling Assistant's showDocumentation() function.
 void FindFileDialog::help()
 {
     currentAssistant->showDocumentation("filedialog.html");
 }
Summary
In order to make Qt Assistant act as a customized help tool for your application, you must provide your application with a process that controls Qt Assistant in addition to a custom help collection file including Qt compressed help files.
For more information about the options and settings available to applications that use Qt Assistant as a custom help viewer, see Customizing Qt Assistant.