A Quick Start to Qt Designer
Using Qt Designer involves four basic steps:
- Choose your form and objects
- Lay the objects out on the form
- Connect the signals to the slots
- Preview the form
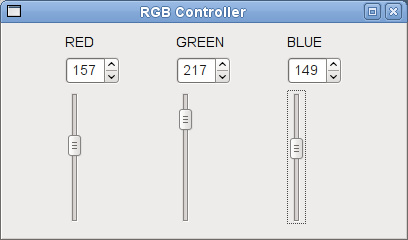
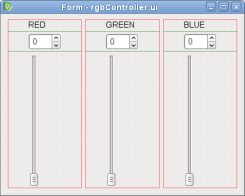
Suppose you would like to design a small widget (see screenshot above) that contains the controls needed to manipulate Red, Green and Blue (RGB) values -- a type of widget that can be seen everywhere in image manipulation programs.
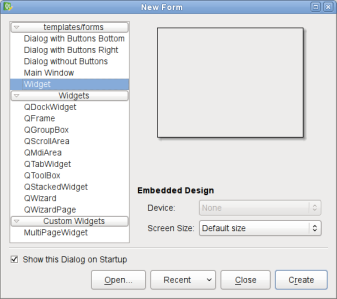 | Choosing a Form You start by choosing Widget from the New Form dialog. |
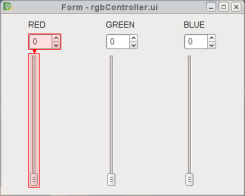
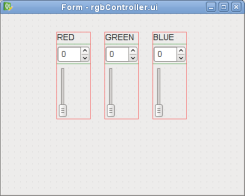 | Placing Widgets on a Form Drag three labels, three spin boxes and three vertical sliders on to your form. To change the label's default text, simply double-click on it. You can arrange them according to how you would like them to be laid out. |
To ensure that they are laid out exactly like this in your program, you need to place these widgets into a layout. We will do this in groups of three. Select the "RED" label. Then, hold down Ctrl while you select its corresponding spin box and slider. In the Form menu, select Lay Out in a Grid.
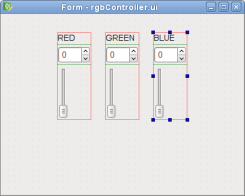 | 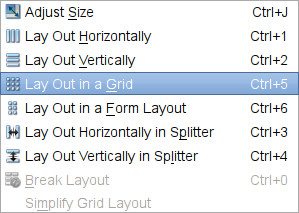 |
Repeat the step for the other two labels along with their corresponding spin boxes and sliders as well.
The next step is to combine all three layouts into one main layout. The main layout is the top level widget's (in this case, the QWidget) layout. It is important that your top level widget has a layout; otherwise, the widgets on your window will not resize when your window is resized. To set the layout, Right click anywhere on your form, outside of the three separate layouts, and select Lay Out Horizontally. Alternatively, you could also select Lay Out in a Grid -- you will still see the same arrangement (shown below).
Note: Main layouts cannot be seen on the form. To check if you have a main layout installed, try resizing your form; your widgets should resize accordingly. Alternatively, you can take a look at Qt Designer's Object Inspector. If your top level widget does not have a layout, you will see the broken layout icon next to it,  .
.
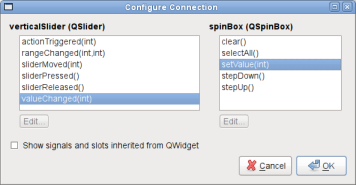
When you click on the slider and drag it to a certain value, you want the spin box to display the slider's position. To accomplish this behavior, you need to connect the slider's valueChanged() signal to the spin box's setValue() slot. You also need to make the reverse connections, e.g., connect the spin box's valueChanged() signal to the slider's setValue() slot.
To do this, you have to switch to Edit Signals/Slots mode, either by pressing F4 or selecting Edit Signals/Slots from the Edit menu.
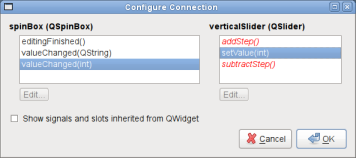
 | Connecting Signals to Slots Click on the slider and drag the cursor towards the spin box. The Configure Connection dialog, shown below, will pop up. Select the correct signal and slot and click OK. |
Repeat the step (in reverse order), clicking on the spin box and dragging the cursor towards the slider, to connect the spin box's valueChanged() signal to the slider's setValue() slot.
You can use the screenshot below as a guide to selecting the correct signal and slot.
Now that you have successfully connected the objects for the "RED" component of the RGB Controller, do the same for the "GREEN" and "BLUE" components as well.
Since RGB values range between 0 and 255, we need to limit the spin box and slider to that particular range.
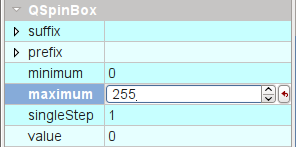 | Setting Widget Properties Click on the first spin box. Within the Property Editor, you will see QSpinBox's properties. Enter "255" for the maximum property. Then, click on the first vertical slider, you will see QAbstractSlider's properties. Enter "255" for the maximum property as well. Repeat this process for the remaining spin boxes and sliders. |
Now, we preview your form to see how it would look in your application - press Ctrl + R or select Preview from the Form menu. Try dragging the slider - the spin box will mirror its value too (and vice versa). Also, you can resize it to see how the layouts that are used to manage the child widgets, respond to different window sizes.