Image Utilities
Overview
The astropy.nddata.utils module includes general utility functions
for array operations.
2D Cutout Images
Getting Started
The Cutout2D class can be used to create a
postage stamp cutout image from a 2D array. If an optional
WCS object is input to
Cutout2D, then the
Cutout2D object will contain an updated
WCS corresponding to the cutout array.
First, we simulate a single source on a 2D data array. If you would like to simulate many sources, see Efficient Model Rendering with Bounding Boxes.
Note: The pair convention is different for size and position! The position is specified as (x,y), but the size is specified as (y,x).
>>> import numpy as np
>>> from astropy.modeling.models import Gaussian2D
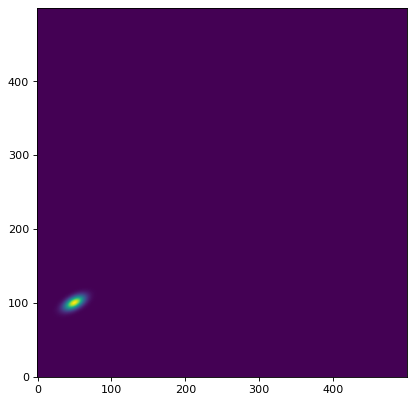
>>> y, x = np.mgrid[0:500, 0:500]
>>> data = Gaussian2D(1, 50, 100, 10, 5, theta=0.5)(x, y)
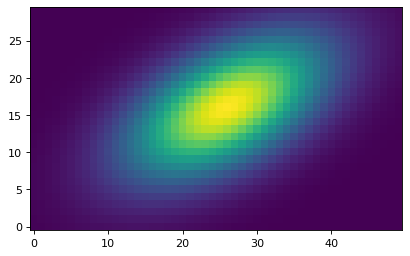
Now, we can display the image:
>>> import matplotlib.pyplot as plt
>>> plt.imshow(data, origin='lower')
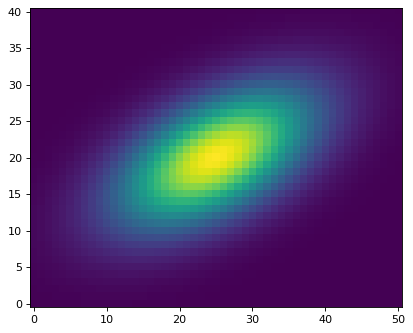
Next we can create a cutout for the single object in this image. We
create a cutout centered at position (x, y) = (49.7, 100.1) with a
size of (ny, nx) = (41, 51) pixels:
>>> from astropy.nddata import Cutout2D
>>> from astropy import units as u
>>> position = (49.7, 100.1)
>>> size = (41, 51)     # pixels
>>> cutout = Cutout2D(data, position, size)
The size keyword can also be a Quantity object:
>>> size = u.Quantity((41, 51), u.pixel)
>>> cutout = Cutout2D(data, position, size)
Or contain Quantity objects:
>>> size = (41*u.pixel, 51*u.pixel)
>>> cutout = Cutout2D(data, position, size)
A square cutout image can be generated by passing an integer or
a scalar Quantity:
>>> size = 41
>>> cutout2 = Cutout2D(data, position, size)

>>> size = 41 * u.pixel
>>> cutout2 = Cutout2D(data, position, size)
The cutout array is stored in the data attribute of the
Cutout2D instance. If the copy keyword is
False (default), then cutout.data will be a view into the
original data array. If copy=True, then cutout.data will
hold a copy of the original data. Now we display the cutout
image:
>>> cutout = Cutout2D(data, position, (41, 51))
>>> plt.imshow(cutout.data, origin='lower')
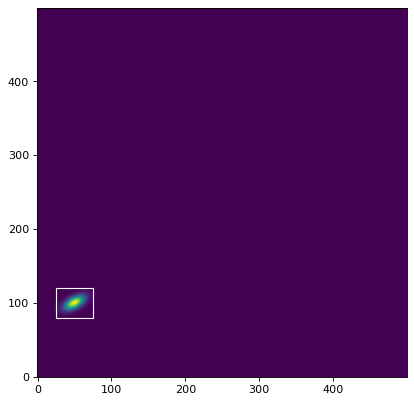
The cutout object can plot its bounding box on the original data using
the plot_on_original() method:
>>> plt.imshow(data, origin='lower')
>>> cutout.plot_on_original(color='white')
Many properties of the cutout array are also stored as attributes, including:
>>> # shape of the cutout array
>>> print(cutout.shape)
(41, 51)

>>> # rounded pixel index of the input position
>>> print(cutout.position_original)
(50, 100)

>>> # corresponding position in the cutout array
>>> print(cutout.position_cutout)
(25, 20)

>>> # (non-rounded) input position in both the original and cutout arrays
>>> print((cutout.input_position_original, cutout.input_position_cutout))
((49.7, 100.1), (24.700000000000003, 20.099999999999994))

>>> # the origin pixel in both arrays
>>> print((cutout.origin_original, cutout.origin_cutout))
((25, 80), (0, 0))

>>> # tuple of slice objects for the original array
>>> print(cutout.slices_original)
(slice(80, 121, None), slice(25, 76, None))

>>> # tuple of slice objects for the cutout array
>>> print(cutout.slices_cutout)
(slice(0, 41, None), slice(0, 51, None))
There are also two Cutout2D methods to convert
pixel positions between the original and cutout arrays:
>>> print(cutout.to_original_position((2, 1)))
(27, 81)

>>> print(cutout.to_cutout_position((27, 81)))
(2, 1)
2D Cutout Modes
There are three modes for creating cutout arrays: 'trim',
'partial', and 'strict'. For the 'partial' and 'trim'
modes, a partial overlap of the cutout array and the input data
array is sufficient. For the 'strict' mode, the cutout array has
to be fully contained within the data array, otherwise an
PartialOverlapError is raised. In all modes,
non-overlapping arrays will raise a
NoOverlapError. In 'partial' mode,
positions in the cutout array that do not overlap with the data
array will be filled with fill_value. In 'trim' mode only the
overlapping elements are returned, thus the resulting cutout array may
be smaller than the requested size.
The default uses mode='trim', which can result in cutout arrays
that are smaller than the requested size:
>>> data2 = np.arange(20.).reshape(5, 4)
>>> cutout1 = Cutout2D(data2, (0, 0), (3, 3), mode='trim')
>>> print(cutout1.data)
[[0. 1.]
 [4. 5.]]
>>> print(cutout1.shape)
(2, 2)
>>> print((cutout1.position_original, cutout1.position_cutout))
((0, 0), (0, 0))
With mode='partial', the cutout will never be trimmed. Instead it
will be filled with fill_value (the default is numpy.nan) if
the cutout is not fully contained in the data array:
>>> cutout2 = Cutout2D(data2, (0, 0), (3, 3), mode='partial')
>>> print(cutout2.data)
[[nan nan nan]
 [nan  0.  1.]
 [nan  4.  5.]]
Note that for the 'partial' mode, the positions (and several other
attributes) are calculated for on the valid (non-filled) cutout
values:
>>> print((cutout2.position_original, cutout2.position_cutout))
((0, 0), (1, 1))
>>> print((cutout2.origin_original, cutout2.origin_cutout))
((0, 0), (1, 1))
>>> print(cutout2.slices_original)
(slice(0, 2, None), slice(0, 2, None))
>>> print(cutout2.slices_cutout)
(slice(1, 3, None), slice(1, 3, None))
Using mode='strict' will raise an exception if the cutout is not
fully contained in the data array:
>>> cutout3 = Cutout2D(data2, (0, 0), (3, 3), mode='strict')
PartialOverlapError: Arrays overlap only partially.
2D Cutout from a SkyCoord Position
The input position can also be specified as a
SkyCoord, in which case a WCS
object must be input via the wcs keyword.
First, we define a SkyCoord position and a
WCS object for our data (usually this would come from
your FITS header):
>>> from astropy.coordinates import SkyCoord
>>> from astropy.wcs import WCS
>>> position = SkyCoord('13h11m29.96s -01d19m18.7s', frame='icrs')
>>> wcs = WCS(naxis=2)
>>> rho = np.pi / 3.
>>> scale = 0.05 / 3600.
>>> wcs.wcs.cd = [[scale*np.cos(rho), -scale*np.sin(rho)],
...               [scale*np.sin(rho), scale*np.cos(rho)]]
>>> wcs.wcs.ctype = ['RA---TAN', 'DEC--TAN']
>>> wcs.wcs.crval = [position.ra.to_value(u.deg),
...                  position.dec.to_value(u.deg)]
>>> wcs.wcs.crpix = [50, 100]
Now we can create the cutout array using the
SkyCoord position and wcs object:
>>> cutout = Cutout2D(data, position, (30, 40), wcs=wcs)
>>> plt.imshow(cutout.data, origin='lower')
The wcs attribute of the Cutout2D object now
contains the propagated WCS for the cutout array.
Now we can find the sky coordinates for a given pixel in the cutout array.
Note that we need to use the cutout.wcs object for the cutout
positions:
>>> from astropy.wcs.utils import pixel_to_skycoord
>>> x_cutout, y_cutout = (5, 10)
>>> pixel_to_skycoord(x_cutout, y_cutout, cutout.wcs)
<SkyCoord (ICRS): (ra, dec) in deg
    ( 197.8747893, -1.32207626)>
We now find the corresponding pixel in the original data array and
its sky coordinates:
>>> x_data, y_data = cutout.to_original_position((x_cutout, y_cutout))
>>> pixel_to_skycoord(x_data, y_data, wcs)
<SkyCoord (ICRS): (ra, dec) in deg
    ( 197.8747893, -1.32207626)>
As expected, the sky coordinates in the original data and the
cutout array agree.
2D Cutout Using an Angular size
The input size can also be specified as a
Quantity in angular units (e.g., degrees, arcminutes,
arcseconds, etc.). For this case, a WCS object must be
input via the wcs keyword.
For this example, we will use the data, SkyCoord
position, and wcs object from above to create a cutout with size
1.5 x 2.5 arcseconds:
>>> size = u.Quantity((1.5, 2.5), u.arcsec)
>>> cutout = Cutout2D(data, position, size, wcs=wcs)
>>> plt.imshow(cutout.data, origin='lower')
Saving a 2D Cutout to a FITS File with an Updated WCS
A Cutout2D object can be saved to a FITS file,
including the updated WCS object for the cutout region. In this example, we
download an example FITS image and create a cutout image. The resulting
Cutout2D object is then saved to a new FITS file with
the updated WCS for the cutout region.
# Download an example FITS file, create a 2D cutout, and save it to a
# new FITS file, including the updated cutout WCS.
from astropy.io import fits
from astropy.nddata import Cutout2D
from astropy.utils.data import download_file
from astropy.wcs import WCS


def download_image_save_cutout(url, position, size):
    # Download the image
    filename = download_file(url)

    # Load the image and the WCS
    hdu = fits.open(filename)[0]
    wcs = WCS(hdu.header)

    # Make the cutout, including the WCS
    cutout = Cutout2D(hdu.data, position=position, size=size, wcs=wcs)

    # Put the cutout image in the FITS HDU
    hdu.data = cutout.data

    # Update the FITS header with the cutout WCS
    hdu.header.update(cutout.wcs.to_header())

    # Write the cutout to a new FITS file
    cutout_filename = 'example_cutout.fits'
    hdu.writeto(cutout_filename, overwrite=True)


if __name__ == '__main__':
    url = 'https://astropy.stsci.edu/data/photometry/spitzer_example_image.fits'

    position = (500, 300)
    size = (400, 400)
    download_image_save_cutout(url, position, size)