Editing in xmh
xmh lets you edit draft messages and other messages too.
Here are some tips about editing in xmh. The following
sections describe common editing commands, using buttons in a
composition window, line wrapping, and copying and pasting text
between windows.
The composition window uses a set of editing commands that are
a subset of GNU Emacs editor commands. All of the text editing
commands actually come from the Athena Text widget. Most of the
commands are control characters and meta-characters. The next two
Tables,
xmh Text Editing Commands: Modifying and
xmh Text Editing Commands: Moving, list
editing commands. The tables are adapted from the X Toolkit Athena
Text widget manual page. There's a summary of these commands in
the xmh Reference Guide, Table 8.
Table: xmh Text Editing Commands:
Modifying
- CTRL-H,
Delete,
Backspace: before
- CTRL-D: after
- Remove the character immediately after or before the
insertion point. If a carriage return is removed, the next line
is appended to the end of the current line.
- META-H,
META-Delete,
META-Backspace: before
- META-D: after
- Remove all characters after or before the insertion point
location and the next word boundary. A word boundary is defined
as a space, a tab, or a carriage return.
- META-SHIFT-H,
META-SHIFT-Delete,
META-SHIFT-Backspace: before
- META-SHIFT-D: after
- These actions act exactly like the un-shifted actions in the
previous cell of this table, but they store the word that was
killed into the kill buffer.
- CTRL-W
- Delete the current selection and store the deleted text into
the kill buffer.
- CTRL-K
- Delete the entire line to the right of the insertion point,
and store the deleted text into the kill buffer.
- META-K
- Delete everything between the current insertion point and
the next paragraph boundary, and put the deleted text into the
kill buffer.
- CTRL-J, Linefeed
- Insert a newline into the text and add spaces to that line
to indent it to match the previous line.
- CTRL-O
- Insert a newline into the text after the insertion
point.
- CTRL-M, Return
- Insert a newline into the text before the insertion
point.
- META-I
- Activate the insert-file pop up. The filename is empty at
startup.
- META-Q
- Remove all the carriage returns from the current paragraph
and reinsert them so that each line is as wide as possible,
while still fitting on the current screen. Lines are broken at
word boundaries if at all possible.
- CTRL-T
- Switch the positions of the character to the left of the
insertion point and the character to the right of the insertion
point. The insertion point will then be advanced one character.
- CTRL-L
- Recompute the location of all the text lines on the display,
scroll the text to center vertically the line containing the
insertion point on the screen, clear the entire screen, and then
redisplay it.
Table: xmh Text Editing Commands:
Moving
- CTRL-F, Right Arrow: forward
- CTRL-B, Left Arrow: backward
- Move the insertion point forward or backward one character
in the buffer. If the insertion point is at the end (or
beginning) of a line, this action moves the insertion point to
the next (or previous) line.
- META-F: next
- META-B: previous
- Move the insertion point to the next or previous word
boundary. A word boundary is defined as a space, a tab, or a
carriage return.
- META-]: next
- META-[: previous
- Move the insertion point to the next or previous paragraph
boundary. A paragraph boundary is defined as two carriage
returns in a row with only spaces or tabs between them.
- CTRL-A: beginning
- CTRL-E: end
- Move to the beginning or end of the current line. If the
insertion point is already at the end or beginning of the line,
no action is taken.
- CTRL-V: up
- META-V: down
- Move the insertion point up or down one page in the file.
One page is defined as the current height of the text widget.
These actions always place the insertion point at the first
character of the top line.
- META-<: beginning
- META->: end
- Place the insertion point at the beginning or end of the
current text buffer. The text widget is then scrolled the
minimum amount necessary to make the new insertion point
location visible.
- CTRL-P, Up Arrow: up
- CTRL-N, Down Arrow: down
- Move the insertion point up or down one line. If the insert
point is currently n characters from the beginning of the
line then it will be n characters from the beginning of
the next or previous line. If n is past the end of the
line, the insertion point is placed at the end of the line.
- CTRL-Z: up
- META-Z: down
- Scroll the current text field up or down by one line. These
do not move the insertion point. Other than the scrollbars, this
is the only way that the insertion point may be moved off of the
visible text area. The widget will be scrolled so that the
insertion point is back on the screen as soon as some other
action is executed.
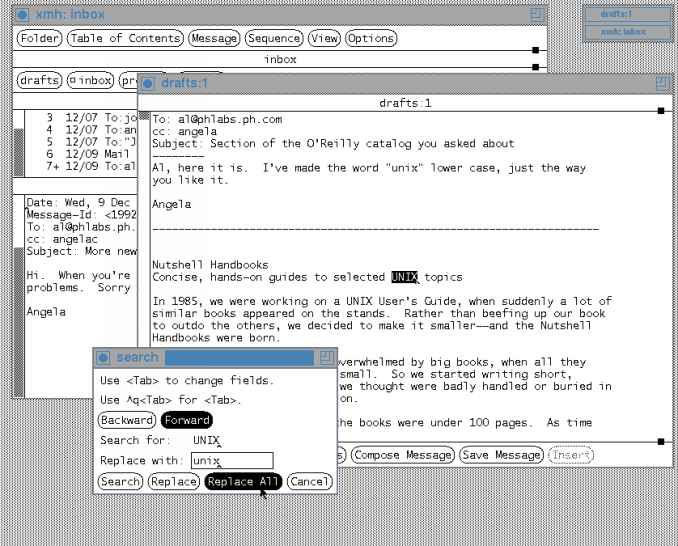
Pressing CTRL-S in an editable window pops up a
search-and-replace window like the one in the
Figure below.
If the text in the window can't be edited (for example, it's
displaying a message), you can search but not replace. The search
moves forward -- that is, from the top of the file toward the end.
To move backward, start with CTRL-R or click
the Backward button.
Figure: Search and replace pop-up
window
When you compose, forward, or reply to a message, a composition
window opens. The functions of buttons at the bottom of the window
may seem obvious, but three of them could use more explanation:
-
The New Headers button is
misleading. It doesn't just make a new header. It
replaces everything in the message, like starting from
scratch. A confirmation box comes up to be sure that you're
sure.
-
The Close Window button does just
that.
If you've made changes, you should have
saved them with the
Save Message button first -- though you'll be asked for
confirmation if you haven't saved.
(NOTE: xmh Release 4 has a bug
here: if you click the Close
Window button twice, you'll get two copies of the
confirmation window. If you click Yes in both of
them, xmh will crash.)
Closing the window leaves the draft message in
your drafts folder -- if you've saved the draft at least
once before. You can
come back to it later by
opening the drafts folder in a main window, selecting the
draft message that you want to work on, and selecting
Use as Composition or Edit Message.
-
The Insert button is grayed (which means you can't use
it) unless you're replying to a message. When you're replying,
if you click the button, a copy of the message you're replying
to will be inserted at the text caret (^). The
Section ReplyInsertFilter has more
information.
To neaten the lines in a paragraph you're editing, press
META-Q. The lines will fill neatly, broken at the spaces between
words closest to the right margin. To me, this makes the lines a
little too wide for people to include them neatly in their
replies. If I'll be reformatting paragraphs, I resize my window to
a 65-character width first.
There's one "gotcha" with META-Q. If you press it in the first
paragraph of a message, just under the header, it will reformat
the header, too.
The Figure below shows the mess you'll get.
Figure: META-Q reformatting mistake
An easy fix is to put a blank line before the paragraph before
typing META-Q. I couldn't train myself to do that. So, instead, I
changed my
components draft file and
replaced the row of dashes with a blank line. I start typing at
the end of the draft, as always, but now there's no row of dashes
that joins the header to the paragraph.
When you're typing an original mail message or adding text to
an existing one, each line you type will wrap
automatically. That is, until you press RETURN, the words on all
the lines will be adjusted to fit neatly between margins. To start
a new paragraph, simply press RETURN (twice to make a blank line).
When you send the message, text in each paragraph is broken into
lines -- it's not necessarily broken the way it looks in your
window. You can make two settings that affect the way lines are
broken. Here's what they do:
- SendBreakWidth
-
A "high-water mark" for line width. No line will be broken
unless it's wider than SendBreakWidth.
- SendWidth
-
The maximum width for lines that have been broken.
You can set these on fields in your message header (as explained
later in this section) or in your resource manager. For example,
with the SendBreakWidth set to 2000 (that's the default
in xmh Release 6), it's a good bet that no lines will be
broken -- no matter what setting of SendWidth you use --
because no line will be wider than SendBreakWidth.
You can tell xmh to cut the line width for you by putting
new values of SendBreakWidth and/or SendWidth in the
message header. In the composition window, add the new field(s) to
the header the same way that you'd insert new lines in the body.
(Be sure not to leave any empty lines in the header, though.) For
example, to set SendBreakWidth and SendWidth at 60
characters each, make your header look something like this:
    SendWidth: 60
    SendBreakWidth: 60
    To: joed
    Cc: angelac
    Subject: Section of xmh(1) manual page you asked for
xmh takes those special fields out of the header before
sending the message.
You can copy text from one window into another or within a
window. For instance, let's say that you have an xterm
window open and it's showing an error message. You can mail a copy
of that error to the software maintainers by copying it into
an xmh composition window.
Here are the steps to use for copying text from one window to
another:
-
Open the composition window and start to compose your message.
Move the text cursor (the caret (^)) to the place where
you want to insert the copied text.
-
In the window you want to copy from, select the text to copy.
There are two ways to select the text. You can click on the
first character in the text you want to copy (with your first
mouse button), release the button, move to the last character,
and click with the third button. That should select all the text
in between (it'll be shown in reverse video).
Or you can point to the first character -- then, hold down the
first button and drag the pointer across the other text you want
-- release the first button when you've selected all the text.
Again, the selected text should be in reverse video.
If you can't get it to work, be sure that your pointer is inside
the window border. Also, you can't copy text from every window
on your screen -- some won't let you copy.
-
You should have a highlighted area in the window now. Click the
second mouse button in the composition window, and the text
should be copied in.
If you accidentally click the first mouse button before you copy
the text, you'll need to reselect the text and try again.
If you'd like to try a different text editor with xmh
and you have access to the X Release 5 source code, look in the
directory contrib/clients/xmh.editor. This contains patches
to the xmh code that allow, among other things, you to
choose your own editor.
For example, the patch would let you add an entry like one of the
two below to your resource file. The first one chooses
the gnu editor; the second opens an
xterm window running vi:
    Xmh.editorCommand: gnu -i -w 80x35+100+20 %s
    Xmh.editorCommand: xterm -e vi %s
If you haven't patched X source code, ask your system
administrator. There's not room in this book to explain how...
If you can't patch the source code, there's another way to use an
external editor -- though it's clumsy. The
new XmhShellCommand() action can start an external editor.
The Section Use an External
Editor shows how.