| 7.2. Nuovo livello | ||
|---|---|---|

|
7. Il menu «Livello» |  |
| 7.2. Nuovo livello | ||
|---|---|---|
|
|
7. Il menu «Livello» | |
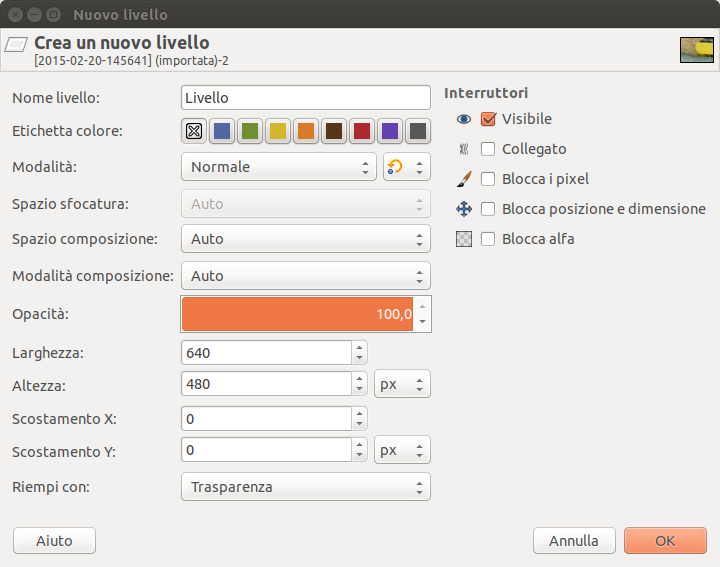
Il comando apre la finestra di dialogo «Crea un nuovo livello» che permette di aggiungere un nuovo livello vuoto alla pila dei livelli dell'immagine, appena sopra il livello attivo.
È possibile accedere a questo comando dalla barra del menu immagine tramite → .
Below the title «Create a new layer», the name of the image that this new layer will belong to, is displayed. To the right of the title a thumbnail of that image is shown. This will enable you to check that you are adding the layer to the correct image when there is more than one image open.
The name of the new layer. It does not have any functional significance; it is simply a convenient way for you to remember the purpose of the layer. The default name is «Layer», but it remembers the last name you used. If a layer with the name you chose already exists, a number is automatically appended to it to make the name unique (e.g., «Layer #1») when you click to create the layer.
If you click on one of these color buttons, the "Eye" icon box of the created layer will have this color. This can help you identify or group layers to make them easier to spot when you have a lot of layers in your image.
A layer's mode determines how the layer is combined with the layers below it. The default is «Normal». The drop-down list offers a wide choice of layer modes, also known as blend modes. On the right, there is another drop-down list to select between «Default» or «Legacy» layer modes.
Layer modes are described in more detail in Layer Modes and Legacy Layer Modes.
The color space used for blending or compositing the layer with the layers below it. «Blending» determines how the colors of the upper and lower layer are mixed together, and «compositing» how the upper and lower layer are merged together with respect to the transparency of each pixel.
Depending on the layer mode (see above) one or both of these settings may be disabled. It is only enabled for layer modes where setting this has any effect. When enabled, the default is Auto. The other choices are RGB (linear) and RGB (perceptual). Note that what Auto translates to, depends on the chosen layer mode. It is not the same for all modes. Some use linear, others use perceptual.
The linear and perceptual encodings are described in choosing precision and encoding and in the Glossary.
![[Nota]](images/note.png)
|
Nota |
|---|---|
|
When changing the layer mode, both Blend space and Composite space are always reset to Auto to make sure the settings make sense for that particular layer mode. |
The layer Mode, sometimes referred to as its «blend mode» (Normal, Multiply, etc.), determines how the color values of the layer and its backdrop are combined (together with the Blend space setting). The composite mode of a layer determines how the alpha values of the layer and its backdrop are combined (together with the Composite space setting). The layer's backdrop is the content against which the layer is composited; namely, it's the combination of the layers below it.
There are two regions of interest when compositing the layer against its backdrop: the opaque region of the backdrop, and the opaque region of the layer. The layer's blend mode determines how to combine the colors of the intersection of these two regions: i.e., the common opaque region of both the backdrop and the layer (pixels belonging to only one of these regions don't need to be combined with anything, and retain their original color). The layer's composite mode determines which part of these regions to keep, and which to discard.
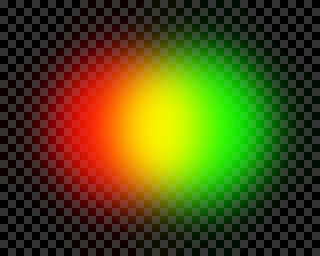
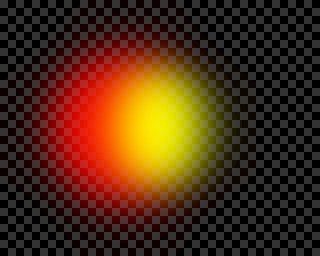
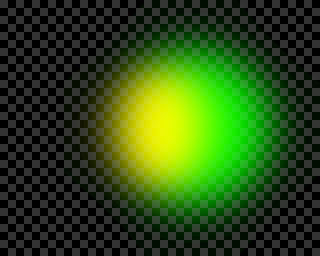
The example images below show the composition of two layers — the bottom layer containing a red feathered circle, and the top layer containing a green feathered circle — using «Addition» mode, and different composite modes (applied to the top layer).
Unione: mantiene le regioni opache sia del livello che del suo sfondo, cioè la loro unione.
Ritaglio allo sfondo: mantiene solo le regioni opache dello sfondo (questo include la regione opaca comune sia dello sfondo che del livello, cioè la loro intersezione).
Ritaglio al livello: mantiene solo la regione opaca del livello (questo include la regione opaca comuni sia allo sfondo che al livello, cioè la loro intersezione).
Intersezione: mantiene solo la regione opaca sia dello sfondo che del livello, quindi la loro intersezione.
Auto: la modalità «Auto» non è un'altra modalità di composizione, piuttosto corrisponde ad una delle altre modalità di composizione, a seconda della modalità di fusione del livello: per «Normale», «Dissolvi», e «Fondi», corrisponde a «Unione», e per le altre modalità (che supportano altre modalità di composizione) corrisponde a «Ritaglio allo sfondo».
Imposta l'opacità del disegno sul livello. Il valore predefinito è 100%.
Le dimensioni del nuovo livello. Quando appare la finestra di dialogo, i valori sono inizializzati alle dimensioni dell'immagine. È naturalmente possibile cambiarli usando le due caselle di immissione testo. È possibile cambiare anche l'unità di misura delle dimensioni usando il menu a tendina dislocato a destra di queste, della finestra.
The default origin of the new layer is the upper left corner of the image canvas. Here, you can set the exact position of the layer. By choosing a negative offset, you can set the layer to be partially outside the image canvas.
There are five options for filling the new layer: the current Foreground color, the current Background color, White, Transparency, and the current Pattern.
These switches on the right side of this dialog are described in the Layer Dialog documentation. See Layer Attributes (Visible and Linked), and Layer Characteristics (Lock pixels, Lock position and size, Lock alpha).