
|
Doxygen
|
Doxygen provides various levels of customization. The section Minor Tweaks discusses what to do if you want to do minor tweaking to the look and feel of the output. The section Layout show how to reorder and hide certain information on a page. The section XML output show how to generate whatever output you want based on the XML output produced by doxygen.
The next subsections describe some aspects that can be tweaked with little effort.
To change the overall color of the HTML output doxygen provides three options
to change the hue, saturation, and gamma correction of the colors respectively.
For your convenience the GUI frontend Doxywizard has a control that allows you to see the effect of changing the values of these options on the output in real time.
By default doxygen shows navigation tabs on top of every HTML page, corresponding with the following settings:
NO NO 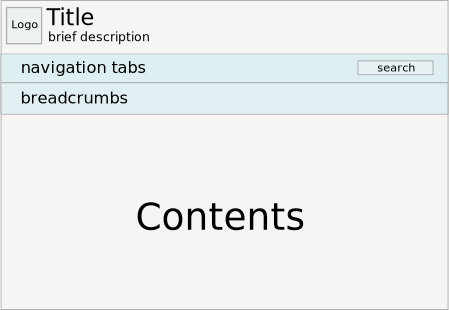
you can switch to an interactive navigation tree as sidebar using
YES YES NO 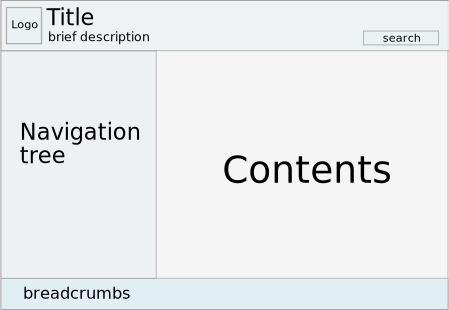
you can also make the content span the title area of the screen using
YES YES YES 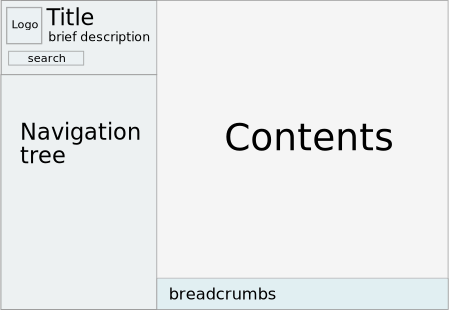
or even have both forms of navigation:
NO YES 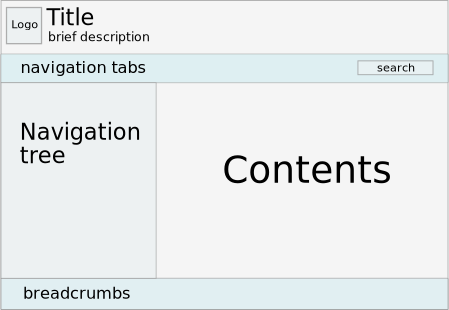
if you already use an external index (i.e. have one of the following options enabled GENERATE_HTMLHELP, GENERATE_ECLIPSEHELP, GENERATE_QHP, or GENERATE_DOCSET) then you can also disable all indices, like so:
YES NO 
To make the HTML output more interactive, doxygen provides a number of options that are disabled by default:
svg, will make doxygen produce SVG images that will allow the user to zoom and pan (this only happens when the size of the images exceeds a certain size).To tweak things like fonts or colors, margins, or other look & feel aspects of the HTML output in detail, you can create a different cascading style sheet. You can also let doxygen use a custom header and footer for each HTML page it generates, for instance to make the output conform to the style used on the rest of your web site.
To do this first run doxygen as follows:
doxygen -w html header.html footer.html customdoxygen.css
This will create 3 files:
You should edit these files and then reference them from the configuration file.
header.html footer.html my_customdoxygen.css See the documentation of the HTML_HEADER tag for more information about the possible meta commands you can use inside your custom header.
In some cases you may want to change the way the output is structured. A different style sheet or custom headers and footers do not help in such case.
The solution doxygen provides is a layout file, which you can modify and doxygen will use to control what information is presented, in which order, and to some extent also how information is presented. The layout file is an XML file.
The default layout can be generated by doxygen using the following command:
doxygen -l
optionally the name of the layout file can be specified, if omitted DoxygenLayout.xml will be used.
The next step is to mention the layout file in the configuration file
LAYOUT_FILE = DoxygenLayout.xml
To change the layout all you need to do is edit the layout file.
The toplevel structure of the file looks as follows:
<doxygenlayout version="1.0">
  <navindex>
    ...
  </navindex>
  <class>
    ...
  </class>
  <namespace>
    ...
  </namespace>
  <concept>
    ...
  </concept>
  <file>
    ...
  </file>
  <group>
    ...
  </group>
  <directory>
    ...
  </directory>
</doxygenlayout>
The root element of the XML file is doxygenlayout, it has an attribute named version, which will be used in the future to cope with changes that are not backward compatible.
The first section, identified by the navindex element, represents the layout of the navigation tabs displayed at the top of each HTML page. At the same time it also controls the items in the navigation tree in case GENERATE_TREEVIEW is enabled. Each tab is represented by a tab element in the XML file.
You can hide tabs by setting the visible attribute to no. You can also override the default title of a tab by specifying it as the value of the title attribute. If the title field is the empty string (the default) then doxygen will fill in an appropriate language specific title.
You can reorder the tabs by moving the tab elements in the XML file within the navindex element and even change the tree structure. Do not change the value of the type attribute however. Only a fixed set of types are supported, each representing a link to a specific index.
You can also add custom tabs using a type with name "user". Here is an example that shows how to add a tab with title "Google" pointing to www.google.com:
  <navindex>
    ...
    <tab type="user" url="http://www.google.com" title="Google"/>
    ...
  </navindex>
The url field can also be a relative URL. If the URL starts with @ref the link will point to a documented entities, such as a class, a function, a group, or a related page. Suppose we have defined a page using @page with label mypage, then a tab with label "My Page" to this page would look as follows:
  <navindex>
    ...
    <tab type="user" url="@ref mypage" title="My Page"/>
    ...
  </navindex>
You can also group tabs together in a custom group using a tab with type "usergroup". The following example puts the above tabs in a user defined group with title "My Group":
  <navindex>
    ...
    <tab type="usergroup" title="My Group">
      <tab type="user" url="http://www.google.com" title="Google"/>
      <tab type="user" url="@ref mypage" title="My Page"/>
    </tab>
    ...
  </navindex>
Groups can be nested to form a hierarchy.
By default a usergroup entry in the navigation tree is a link to a landing page with the contents of the group. You can link to a different page using the url attribute just like you can for the <tab> element and prevent any link using url="[none]", i.e.
   <tab type="usergroup" title="Group without link" url="[none]">
   ...
   </tab>
The elements after navindex represent the layout of the different pages generated by doxygen:
class element represents the layout of all pages generated for documented classes, structs, unions, and interfaces.namespace element represents the layout of all pages generated for documented namespaces (and also Java packages).concept element represents the layout of all pages generated for documented concepts.file element represents the layout of all pages generated for documented files.group element represents the layout of all pages generated for documented groups (or modules).directory element represents the layout of all pages generated for documented directories.Each XML element within one of the above page elements represents a certain piece of information. Some pieces can appear in each type of page, others are specific for a certain type of page. Doxygen will list the pieces in the order in which they appear in the XML file.
The following generic elements are possible for each page:
briefdescription detaileddescription authorsection Generated automatically by Doxygen for My Project from the source code. This should not be misinterpreted with the doxygen commands \author or \authors that generate an author paragraph inside a detailed description. The following generic elements are possible for each page except the concept page:
memberdecl memberdef memberdecl element, also this element has a number of possible child elements. The class page has the following specific elements:
includes inheritancegraph collaborationgraph allmemberslink usedfiles The concept page has the following specific elements:
includes definition The file page has the following specific elements:
includes includegraph includedbygraph sourcelink The group page has a specific groupgraph element which represents the graph showing the dependencies between groups.
Similarly, the directory page has a specific directorygraph element which represents the graph showing the dependencies between the directories based on the #include relations of the files inside the directories.
Some elements have a visible attribute which can be used to hide the fragment from the generated output, by setting the attribute's value to "no". You can also use the value of a configuration option to determine the visibility, by using its name prefixed with a dollar sign, e.g.
  ...
  <includes visible="$SHOW_INCLUDE_FILES"/>
  ...
This was mainly added for backward compatibility. Note that the visible attribute is just a hint for doxygen. If no relevant information is available for a certain piece it is omitted even if it is set to yes (i.e. no empty sections are generated).
Some elements have a title attribute. This attribute can be used to customize the title doxygen will use as a header for the piece.
If the above two methods still do not provide enough flexibility, you can also use the XML output produced by doxygen as a basis to generate the output you like. To do this set GENERATE_XML to YES.
The XML output consists of an index file named index.xml which lists all items extracted by doxygen with references to the other XML files for details. The structure of the index is described by a schema file index.xsd. All other XML files are described by the schema file named compound.xsd. If you prefer one big XML file you can combine the index and the other files using the XSLT file combine.xslt.
You can use any XML parser to parse the files or use the one that can be found in the addon/doxmlparser directory of doxygen's source distribution. Look at addon/doxmlparser/doxmlparser/index.py and addon/doxmlparser/doxmlparser/compound.py for the interface of the parser (it is generated by generatedDS and follows the XML schema files index.xsd and compound.xsd found in templates/xml). Look in addon/doxmlparser/examples for examples.
The advantage of using the doxmlparser is that it allows you to only read the index file into memory and then only those XML files that you implicitly load via navigating through the index. As a result this works even for very large projects where reading all XML files as one big DOM tree would not fit into memory.
See the Breathe project for an example that uses doxygen XML output from Python to bridge it with the Sphinx document generator.