Collision Detection
As of release 0.7.8 ClanLib comes with collision detection support. The collision system works by checking for intersections between line segments in line-loops surrounding the objects to collide. The advantage of this method over traditional methods, such as pixel based collision detection, is that the amount of data that needs to be worked with when checking for collisions and when doing transformations is very low. This enables besides fast collision testing also fast rotation and scaling of outline geometries.
Collision Outlines
Outlines can be generated from RGBA images by following the edge between transparent and opaque pixels.
To generate an outline from a RGBA image stored as image.png the following can be used:
CL_CollisionOutline outline("image.png");
Generating outlines from bitmaps can be quite expensive causing long load times. To battle that CL_CollisionOutline has a save function and constructors which can load saved outlines:
CL_CollisionOutline generated("image.png");
generated.save("image.out");

CL_CollisionOutline loaded("image.out");
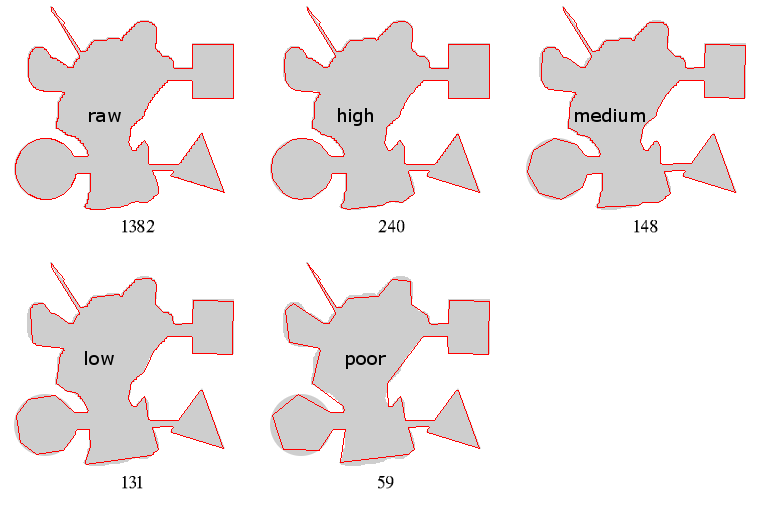
Initially the contour following algorithm adds every pixel along the edge to the outline. This results in a lot of redundant information being added to the outline, but that can be optimized away without reducing the accuracy of the outline too much. The constructor which creates outlines from RGBA images takes a CL_OutlineAccuracy parameter which specifies how much to optimize the outline.
CL_CollisionOutline generated("image.png", accuracy_high);
The values for CL_CollisionAccuracy are:
- accuracy_raw
- accuracy_high
- accuracy_medium
- accuracy_low
- accuracy_poor

The optimization causes errors mostly in the round parts.
Testing for collisions
Once the collision outlines have been positioned using the transformation function (translate, rotate and scale) checking for a collision is simply a matter of calling the collide function. In a game one might have code similar to this:
if( outline.collide(outline2) )
{
	foo();
}
It's also possible to test if a point is inside an outline:
if( outline.point_inside( CL_Mouse::get_x(), CL_Mouse::get_y() )
{
	bar();
}
When checking for a collision a bounding circle test is always performed first. The way the collision testing is done can be adjusted by enabling/disabling completely inside test, and by enable/disable the object bounding box test.
When using the inside test, outlines completely inside another outline (or completely surrounding) will report a collision. If either of the objects being tested has inside_test set to true, the inside test will be done for both objects.
Object bounding box (obb) test uses a rotated tightly computed rectangle around the outline, and the obb is tested against the other obb first before any further (more detailed) collision detection tests are performed. For long narrow outlines an obb will give a lot more tighter bounds than a bounding circle, effectively eliminating further redundant checks.
outline.set_inside_test(true);
outline.set_obb_test(false);
Internal operation
The structure of the collision data structures is as follows:
CL_CollisionOutline
	CL_Contour(s)
		vector<CL_Pointf> points
		vector<CL_CollisionCircle> subcircles
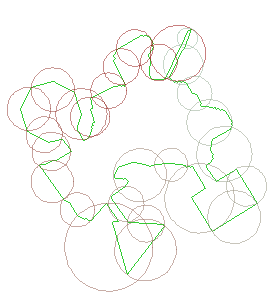
Collisions are checked for by checking each line-segment forming the outline, against the line-segments of the other collision outline. If the number of line segments is big this will be somewhat slow. To eliminate checks that are sure to fail, the line-segments have been grouped into circles which hold a start and end index in the point array.
These sub-circles are collided against each other before any line-line intersection tests take place. Line-segments encapsulated in subcircles are only checked when two subcircles collides with each other. If the subcircles don't collide there is no chance that the line-segments inside them will collide either.

If an outline is created manually by adding a contour to the outline and points into the contour, it's necessary to calculate the subcircles and the radius before collision tests can be performed. It should also be noted that the points of the contour is assumed "closed" that is, you do not need to specify the same point as both first and last. And the points must be added to the contour in counter-clockwice order.
	CL_SurfaceOutline outline;

	CL_Contour contour;
	contour.points.push_back( CL_Pointf(0.0f,0.0f) );
	contour.points.push_back( CL_Pointf(0.0f,100.0f) );
	outline.get_contours().push_back(contour);
	outline.calculate_radius();
	outline.calculate_sub_circles();
If your contours are rather small, you can optimise them to only have one (sub)circle. This circle is calculated to be as small as possible, and still contain all the points. It can be done with the following code.
	[... create the outline in some way ...]
	// Use this in-stead of "calculate_sub_circles()";
	outline.calculate_smallest_enclosing_discs();
Collision Info
If you have enabled any kind of collision info (with enable_collision_info(points,normals,metadata)) then you can retrieve this information with the method get_collision_info. What will be returned is a vector with CL_CollidingContours-structures. Each representing the collision of two contours.
These structures contain the information you asked the outlines to collect. They always contain two pointers to the colliding contours. These are called: contour1 and contour2. If you told it to collect collision-points, then these can be found as the "point" property of all the CL_CollisionPoint stored in the vector points. If you told it to collect normals then they can be found as the "normal" property of all the CL_CollisionPoint stored in the vector points.
The following code demonstrates how you can access the information.
	outline.enable_collision_info(true, true, false);
	if( outline.collide(outline2) )
	{
		const std::vector<CL_CollidingContours> &colpointinfo = outline.get_collision_info();
		// Loop through all pairs of colliding contours
		for(int c = 0; c < colpointinfo.size(); c++)
		{
			const CL_CollidingContours &cc = colpointinfo[c];
			for(int p = 0; p < cc.points.size(); p++)
			{
				std::cout << "Collision: Point(" << cc.points[p].point.x << "," << cc.points[p].point.y << ")\n";
				std::cout << "Collision: Normal(" << cc.points[p].normal.x << "," << cc.points[p].normal.y << ")\n";
			}
		}
	}
Collision Metadata
The metadata-part of a collision takes a bit more explaination. It is used to keep track of where the intersections between two contours occured. That is they keep track of what linesegments generated the collision-points. They also keep track of wether the collision point is an entry or an exit point (Note this works because all contours are describes as a list of points in counter-clockwice order). The metadata is mainly intended to calculate the depth of a penetration. Since contours only store the points, and not the linesegments, we have to store the two indexes of the two points that represent the linesegment. And we have to do this for both linesegments.
The following peace of code shows how to access the metadata.
	outline.enable_collision_info(true, true, true);
	if( outline.collide(outline2) )
	{
		const std::vector<CL_CollidingContours> &colpointinfo = outline.get_collision_info();
		// Loop through all pairs of colliding contours
		for(int c = 0; c < colpointinfo.size(); c++)
		{
			const CL_CollidingContours &cc = colpointinfo[c];
			for(int p = 0; p < cc.points.size(); p++)
			{
				const CL_CollisionPoint &colp = cc.points[p];
				std::cout << "LineSegment1:"
					<< "(" << cc.contour1->points[colp.contour1_line_start].x
					<< "," << cc.contour1->points[colp.contour1_line_start].y << ") - "
					<< "(" << cc.contour1->points[colp.contour1_line_end].x
					<< "," << cc.contour1->points[colp.contour1_line_end].y << ")\n";
				std::cout << "LineSegment2:"
					<< "(" << cc.contour2->points[colp.contour2_line_start].x
					<< "," << cc.contour2->points[colp.contour2_line_start].y << ") - "
					<< "(" << cc.contour2->points[colp.contour2_line_end].x
					<< "," << cc.contour2->points[colp.contour2_line_end].y << ")\n";
			}
		}
	}
