3. Fixing a bug in Ubuntu
3.1. Introduction
If you followed the instructions to get set up with Ubuntu Development, you should be all set and ready to go.
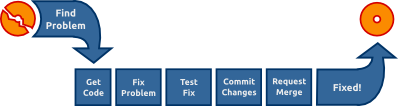
As you can see in the image above, there is no surprises in the process of fixing bugs in Ubuntu: you found a problem, you get the code, work on the fix, test it, push your changes to Launchpad and ask for it to be reviewed and merged. In this guide we will go through all the necessary steps one by one.
3.2. Finding the problem
There are a lot of different ways to find things to work on. It might be a bug report you are encountering yourself (which gives you a good opportunity to test the fix), or a problem you noted elsewhere, maybe in a bug report.
Take a look at the bitesize bugs in Launchpad, and that might give you an idea of something to work on. It might also interest you to look at the bugs triaged by the Ubuntu One Hundred Papercuts team.
3.3. Figuring out what to fix
If you don’t know the source package containing the code that has the problem, but you do know the path to the affected program on your system, you can discover the source package that you’ll need to work on.
Let’s say you’ve found a bug in Bumprace, a racing game. The Bumprace
application can be started by running /usr/bin/bumprace on the command
line. To find the binary package containing this application, use this command:
$ apt-file find /usr/bin/bumprace
This would print out:
bumprace: /usr/bin/bumprace
Note that the part preceding the colon is the binary package name. It’s often the case that the source package and binary package will have different names. This is most common when a single source package is used to build multiple different binary packages. To find the source package for a particular binary package, type:
$ apt-cache showsrc bumprace | grep ^Package:
Package: bumprace
$ apt-cache showsrc tomboy | grep ^Package:
Package: tomboy
apt-cache is part of the standard installation of Ubuntu.
3.4. Confirming the problem
Once you have figured out which package the problem is in, it’s time to confirm that the problem exists.
Let’s say the package bumprace does not have a homepage in its package
description. As a first step you would check if the problem is not solved
already. This is easy to check, either take a look at Software Center or run:
apt-cache show bumprace
The output should be similar to this:
Package: bumprace
Priority: optional
Section: universe/games
Installed-Size: 136
Maintainer: Ubuntu Developers <ubuntu-devel-discuss@lists.ubuntu.com>
XNBC-Original-Maintainer: Christian T. Steigies <cts@debian.org>
Architecture: amd64
Version: 1.5.4-1
Depends: bumprace-data, libc6 (>= 2.4), libsdl-image1.2 (>= 1.2.10),
         libsdl-mixer1.2, libsdl1.2debian (>= 1.2.10-1)
Filename: pool/universe/b/bumprace/bumprace_1.5.4-1_amd64.deb
Size: 38122
MD5sum: 48c943863b4207930d4a2228cedc4a5b
SHA1: 73bad0892be471bbc471c7a99d0b72f0d0a4babc
SHA256: 64ef9a45b75651f57dc76aff5b05dd7069db0c942b479c8ab09494e762ae69fc
Description-en: 1 or 2 players race through a multi-level maze
 In BumpRacer, 1 player or 2 players (team or competitive) choose among 4
 vehicles and race through a multi-level maze. The players must acquire
 bonuses and avoid traps and enemy fire in a race against the clock.
 For more info, see the homepage at http://www.linux-games.com/bumprace/
Description-md5: 3225199d614fba85ba2bc66d5578ff15
Bugs: https://bugs.launchpad.net/ubuntu/+filebug
Origin: Ubuntu
A counter-example would be gedit, which has a homepage set:
$ apt-cache show gedit | grep ^Homepage
Homepage: http://www.gnome.org/projects/gedit/
Sometimes you will find that a particular problem you are looking into is already fixed. To avoid wasting efforts and duplicating work it makes sense to first do some detective work.
3.5. Research bug situation
First we should check if a bug for the problem exists in Ubuntu already. Maybe somebody is working on a fix already, or we can contribute to the solution somehow. For Ubuntu we have a quick look at https://bugs.launchpad.net/ubuntu/+source/bumprace and there is no open bug with our problem there.
Note
For Ubuntu the URL
https://bugs.launchpad.net/ubuntu/+source/<package> should always
take to the bug page of the source package in question.
For Debian, which is the major source for Ubuntu’s packages, we have a look at http://bugs.debian.org/src:bumprace and can’t find a bug report for our problem either.
Note
For Debian the URL http://bugs.debian.org/src:<package> should
always take to the bug page of the source package in question.
The problem we are working on is special as it only concerns the
packaging-related bits of bumprace. If it was a problem in the source code
it would be helpful to also check the Upstream bug tracker. This is
unfortunately often different for every package you have a look at, but if
you search the web for it, you should in most cases find it pretty easily.
3.6. Offering help
If you found an open bug and it is not assigned to somebody and you are in a position to fix it, you should comment on it with your solution. Be sure to include as much information as you can: Under which circumstances does the bug occur? How did you fix the problem? Did you test your solution?
If no bug report has been filed, you can file a bug for it. What you might want to bear in mind is: Is the issue so small that just asking for somebody to commit it is good enough? Did you manage to only partially fix the issue and you want to at least share your part of it?
It is great if you can offer help and will surely be appreciated.
3.7. Getting the code
Once you know the source package to work on, you will want to get a copy of
the code on your system, so that you can debug it. The ubuntu-dev-tools
package has a tool called pull-lp-source that a developer can use to grab
the source code for any package. For example, to grab the source code for the
tomboy package in xenial, you can type this:
$ pull-lp-source bumprace xenial
If you do not specify a release such as xenial, it will automatically get
the package from the development version.
Once you’ve got a local clone of the source package, you can investigate the bug, create a fix, generate a debdiff, and attach your debdiff to a bug report for other developers to review. We’ll describe specifics in the next sections.
3.8. Work on a fix
There are entire books written about finding bugs, fixing them, testing them, etc. If you are completely new to programming, try to fix easy bugs such as obvious typos first. Try to keep changes as minimal as possible and document your change and assumptions clearly.
Before working on a fix yourself, make sure to investigate if nobody else has fixed it already or is currently working on a fix. Good sources to check are:
Upstream (and Debian) bug tracker (open and closed bugs),
Upstream revision history (or newer release) might have fixed the problem,
bugs or package uploads of Debian or other distributions.
You may want to create a patch which includes the fix. The command
edit-patch is a simple way to add a patch to a package. Run:
$ edit-patch 99-new-patch
This will copy the packaging to a temporary directory. You can now edit files with a text editor or apply patches from upstream, for example:
$ patch -p1 < ../bugfix.patch
After editing the file type exit or press control-d to quit the
temporary shell. The new patch will have been added into debian/patches.
You must then add a header to your patch containing meta information so that other developers can know the purpose of the patch and where it came from. To get the template header that you can edit to reflect what the patch does, type this:
$ quilt header --dep3 -e
This will open the template in a text editor. Follow the template and make sure to be thorough so you get all the details necessary to describe the patch.
In this specific case, if you just want to edit debian/control, you do not
need a patch. Put Homepage: http://www.linux-games.com/bumprace/ at the
end of the first section and the bug should be fixed.
3.8.1. Documenting the fix
It is very important to document your change sufficiently so developers who
look at the code in the future won’t have to guess what your reasoning was and
what your assumptions were. Every Debian and Ubuntu package source includes
debian/changelog, where changes of each uploaded package are tracked.
The easiest way to update this is to run:
$ dch -i
This will add a boilerplate changelog entry for you and launch an editor where you can fill in the blanks. An example of this could be:
specialpackage (1.2-3ubuntu4) trusty; urgency=low

  * debian/control: updated description to include frobnicator (LP: #123456)

 -- Emma Adams <emma.adams@isp.com>  Sat, 17 Jul 2010 02:53:39 +0200
dch should fill out the first and last line of such a changelog entry for
you already. Line 1 consists of the source package name, the version number,
which Ubuntu release it is uploaded to, the urgency (which almost always is
‘low’). The last line always contains the name, email address and timestamp
(in RFC 5322 format) of the change.
With that out of the way, let’s focus on the actual changelog entry itself: it is very important to document:
Where the change was done.
What was changed.
Where the discussion of the change happened.
In our (very sparse) example the last point is covered by (LP: #123456)
which refers to Launchpad bug 123456. Bug reports or mailing list threads or
specifications are usually good information to provide as a rationale for a
change. As a bonus, if you use the LP: #<number> notation for Launchpad
bugs, the bug will be automatically closed when the package is uploaded to
Ubuntu.
In order to get it sponsored in the next section, you need to file a bug report in Launchpad (if there isn’t one already, if there is, use that) and explain why your fix should be included in Ubuntu. For example, for tomboy, you would file a bug here (edit the URL to reflect the package you have a fix for). Once a bug is filed explaining your changes, put that bug number in the changelog.
3.9. Testing the fix
To build a test package with your changes, run these commands:
$ debuild -S -d -us -uc
$ pbuilder-dist <release> build ../<package>_<version>.dsc
This will create a source package from the branch contents (-us -uc will
just omit the step to sign the source package and -d will skip the step
where it checks for build dependencies, pbuilder will take care of that) and
pbuilder-dist will build the package from source for whatever release
you choose.
Note
If debuild errors out with “Version number suggests Ubuntu changes, but
Maintainer: does not have Ubuntu address” then run the update-maintainer
command (from ubuntu-dev-tools) and it will automatically fix this for you.
This happens because in Ubuntu, all Ubuntu Developers are responsible for all
Ubuntu packages, while in Debian, packages have maintainers.
In this case with bumprace, run this to view the package information:
$ dpkg -I ~/pbuilder/*_result/bumprace_*.deb
As expected, there should now be a Homepage: field.
Note
In a lot of cases you will have to actually install the package to make
sure it works as expected. Our case is a lot easier. If the build
succeeded, you will find the binary packages in
~/pbuilder/<release>_result. Install them via
sudo dpkg -i <package>.deb or by double-clicking on them in your file
manager.
3.10. Submitting the fix and getting it included
With the changelog entry written and saved, run debuild one more time:
$ debuild -S -d
and this time it will be signed and you are now ready to get your diff to submit to get sponsored.
In a lot of cases, Debian would probably like to have the patch as well (doing this is best practice to make sure a wider audience gets the fix). So, you should submit the patch to Debian, and you can do that by simply running this:
$ submittodebian
This will take you through a series of steps to make sure the bug ends up in the correct place. Be sure to review the diff again to make sure it does not include random changes you made earlier.
Communication is important, so when you add some more description to it to the inclusion request, be friendly, explain it well.
If everything went well you should get a mail from Debian’s bug tracking system with more information. This might sometimes take a few minutes.
It might be beneficial to just get it included in Debian and have it flow down to Ubuntu, in which case you would not follow the below process. But, sometimes in the case of security updates and updates for stable releases, the fix is already in Debian (or ignored for some reason) and you would follow the below process. If you are doing such updates, please read our Security and stable release updates article. Other cases where it is acceptable to wait to submit patches to Debian are Ubuntu-only packages not building correctly, or Ubuntu-specific problems in general.
But if you’re going to submit your fix to Ubuntu, now it’s time to generate a
“debdiff”, which shows the difference between two Debian packages. The name of
the command used to generate one is also debdiff. It is part of the
devscripts package. See man debdiff for all the details. To compare
two source packages, pass the two dsc files as arguments:
$ debdiff <package_name>_1.0-1.dsc <package_name>_1.0-1ubuntu1.dsc
In this case, debdiff the dsc you downloaded with pull-lp-source and
the new dsc file you generated. This will generate a patch that your sponsor
can then apply locally (by using patch -p1 < /path/to/debdiff). In this
case, pipe the output of the debdiff command to a file that you can then
attach to the bug report:
$ debdiff <package_name>_1.0-1.dsc <package_name>_1.0-1ubuntu1.dsc > 1-1.0-1ubuntu1.debdiff
The format shown in 1-1.0-1ubuntu1.debdiff shows:
1-tells the sponsor that this is the first revision of your patch. Nobody is perfect, and sometimes follow-up patches need to be provided. This makes sure that if your patch needs work, that you can keep a consistent naming scheme.
1.0-1ubuntu1shows the new version being used. This makes it easy to see what the new version is.
.debdiffis an extension that makes it clear that it is a debdiff.
While this format is optional, it works well and you can use this.
Next, go to the bug report, make sure you are logged into Launchpad, and click “Add attachment or patch” under where you would add a new comment. Attach the debdiff, and leave a comment telling your sponsor how this patch can be applied and the testing you have done. An example comment can be:
This is a debdiff for Artful applicable to 1.0-1. I built this in pbuilder
and it builds successfully, and I installed it, the patch works as intended.
Make sure you mark it as a patch (the Ubuntu Sponsors team will automatically
be subscribed) and that you are subscribed to the bug report. You will then
receive a review anywhere between several hours from submitting the patch to
several weeks. If it takes longer than that, please join #ubuntu-motu on
Libera Chat and mention it there. Stick around until you get an answer from
someone, and they can guide you as to what to do next.
Once you have received a review, your patch was either uploaded, your patch needs work, or is rejected for some other reason (possibly the fix is not fit for Ubuntu or should go to Debian instead). If your patch needs work, follow the same steps and submit a follow-up patch on the bug report, otherwise submit to Debian as shown above.
Remember: good places to ask your questions are ubuntu-motu@lists.ubuntu.com
and #ubuntu-motu on Libera Chat. You will easily find a lot of new friends
and people with the same passion that you have: making the world a better
place by making better Open Source software.
3.11. Additional considerations
If you find a package and find that there are a couple of trivial things you can fix at the same time, do it. This will speed up review and inclusion.
If there are multiple big things you want to fix, it might be advisable to send individual patches or merge proposals instead. If there are individual bugs filed for the issues already, this makes it even easier.