Detector distortion corrections#
This tutorial shows how to correct images for spatial distortion. Some tutorial examples rely on files available in http://www.silx.org/pub/pyFAI/testimages/ and will be downloaded during this tutorial. The required minimum version of pyFAI is 0.12.0.
Detector definitions#
PyFAI features an impressive list of 64 detector definitions contributed often by manufacturers and some other reverse engineerd by scientists. Each of them is defined as an invividual class which contains a way to calculate the mask (invalid pixels, gaps,…) and a method to calculate the pixel positions in Cartesian coordinates.
[1]:
import time, os, numpy
start_time = time.perf_counter()
import pyFAI, pyFAI.detectors
print(f"pyFAI version: {pyFAI.version}")
all_detectors = list(set(pyFAI.detectors.ALL_DETECTORS.values()))
#Sort detectors according to their name
all_detectors.sort(key=lambda i:i.__name__)
nb_det = len(all_detectors)
print("Number of detectors registered: %i with %i unique detectors"%(len(pyFAI.detectors.ALL_DETECTORS),nb_det))
print()
print("List of all supported detectors:")
for i in all_detectors:
    print(i())
pyFAI version: 2025.3.0
Number of detectors registered: 298 with 109 unique detectors

List of all supported detectors:
Detector Quantum 210     PixelSize= 51µm, 51µm   BottomRight (3)
Detector Quantum 270     PixelSize= 64.8µm, 64.8µm       BottomRight (3)
Detector Quantum 315     PixelSize= 51µm, 51µm   BottomRight (3)
Detector Quantum 4       PixelSize= 82µm, 82µm   BottomRight (3)
Detector Aarhus  PixelSize= 24.893µm, 24.893µm   BottomRight (3)
Detector ApexII%s        PixelSize= 120µm, 120µm
Detector aca1300         PixelSize= 3.750e-06, 3.750e-06 m
Detector CirPAD  PixelSize= 1.300e-04, 1.300e-04 m       BottomRight (3)
Undefined detector
Detector Dexela 2923%s   PixelSize= 75µm, 75µm
Detector Eiger 16M       PixelSize= 75µm, 75µm   BottomRight (3)
Detector Eiger 1M        PixelSize= 75µm, 75µm   BottomRight (3)
Detector Eiger2 CdTe 16M         PixelSize= 75µm, 75µm   BottomRight (3)
Detector Eiger2 CdTe 1M  PixelSize= 75µm, 75µm   BottomRight (3)
Detector Eiger2 CdTe 1M-W        PixelSize= 75µm, 75µm   BottomRight (3)
Detector Eiger2 CdTe 2M-W        PixelSize= 75µm, 75µm   BottomRight (3)
Detector Eiger2 CdTe 4M  PixelSize= 75µm, 75µm   BottomRight (3)
Detector Eiger2 CdTe 500k        PixelSize= 75µm, 75µm   BottomRight (3)
Detector Eiger2 CdTe 9M  PixelSize= 75µm, 75µm   BottomRight (3)
Detector Eiger2 16M      PixelSize= 75µm, 75µm   BottomRight (3)
Detector Eiger2 1M       PixelSize= 75µm, 75µm   BottomRight (3)
Detector Eiger2 1M-W     PixelSize= 75µm, 75µm   BottomRight (3)
Detector Eiger2 250k     PixelSize= 75µm, 75µm   BottomRight (3)
Detector Eiger2 2M-W     PixelSize= 75µm, 75µm   BottomRight (3)
Detector Eiger2 4M       PixelSize= 75µm, 75µm   BottomRight (3)
Detector Eiger2 500k     PixelSize= 75µm, 75µm   BottomRight (3)
Detector Eiger2 9M       PixelSize= 75µm, 75µm   BottomRight (3)
Detector Eiger 4M        PixelSize= 75µm, 75µm   BottomRight (3)
Detector Eiger 500k      PixelSize= 75µm, 75µm   BottomRight (3)
Detector Eiger 9M        PixelSize= 75µm, 75µm   BottomRight (3)
Detector FReLoN  PixelSize= 50µm, 50µm   BottomRight (3)
Detector Fairchild       PixelSize= 15µm, 15µm
Detector HF-130k         PixelSize= 150µm, 150µm         BottomRight (3)
Detector HF-1M   PixelSize= 150µm, 150µm         BottomRight (3)
Detector HF-262k         PixelSize= 150µm, 150µm         BottomRight (3)
Detector HF-2.4M         PixelSize= 150µm, 150µm         BottomRight (3)
Detector HF-4M   PixelSize= 150µm, 150µm         BottomRight (3)
Detector HF-9.4M         PixelSize= 150µm, 150µm         BottomRight (3)
Detector Imxpad S10      PixelSize= 1.300e-04, 1.300e-04 m       BottomRight (3)
Detector Imxpad S140     PixelSize= 1.300e-04, 1.300e-04 m       BottomRight (3)
Detector Imxpad S70      PixelSize= 1.300e-04, 1.300e-04 m       BottomRight (3)
Detector Imxpad S70 V    PixelSize= 1.300e-04, 1.300e-04 m       BottomRight (3)
Detector Jungfrau 500k%s         PixelSize= 75µm, 75µm
Detector Jungfrau 1M     PixelSize= 75µm, 75µm   BottomRight (3)
Detector Jungfrau 4M     PixelSize= 75µm, 75µm   BottomRight (3)
Detector Jungfrau 8M%s   PixelSize= 75µm, 75µm
Detector Jungfrau 16M cor%s      PixelSize= 75µm, 75µm
Detector Lambda 10M      PixelSize= 55µm, 55µm
Detector Lambda 250k     PixelSize= 55µm, 55µm
Detector Lambda 2M       PixelSize= 55µm, 55µm
Detector Lambda 60k      PixelSize= 55µm, 55µm
Detector Lambda 750k     PixelSize= 55µm, 55µm
Detector Lambda 7.5M     PixelSize= 55µm, 55µm
Detector Lambda 9M       PixelSize= 55µm, 55µm
Detector MAR 345         PixelSize= 1.000e-04, 1.000e-04 m
Detector MAR 555         PixelSize= 139µm, 139µm         BottomRight (3)
Detector Maxipix 1x1     PixelSize= 55µm, 55µm
Detector Maxipix 2x2     PixelSize= 55µm, 55µm
Detector Maxipix 5x1     PixelSize= 55µm, 55µm
Detector Mythen 1280     PixelSize= 8mm, 50µm    BottomRight (3)
Detector Perkin detector%s       PixelSize= 200µm, 200µm
Detector Pilatus 100k    PixelSize= 172µm, 172µm         BottomRight (3)
Detector Pilatus 1M      PixelSize= 172µm, 172µm         BottomRight (3)
Detector Pilatus 200k    PixelSize= 172µm, 172µm         BottomRight (3)
Detector Pilatus 2M      PixelSize= 172µm, 172µm         BottomRight (3)
Detector Pilatus 300k    PixelSize= 172µm, 172µm         BottomRight (3)
Detector Pilatus 300kw   PixelSize= 172µm, 172µm         BottomRight (3)
Detector Pilatus4 1M     PixelSize= 150µm, 150µm         BottomRight (3)
Detector Pilatus4 260k   PixelSize= 150µm, 150µm         BottomRight (3)
Detector Pilatus4 260kw  PixelSize= 150µm, 150µm         BottomRight (3)
Detector Pilatus4 2M     PixelSize= 150µm, 150µm         BottomRight (3)
Detector Pilatus4 4M     PixelSize= 150µm, 150µm         BottomRight (3)
Detector Pilatus4 1M CdTe        PixelSize= 172µm, 172µm         BottomRight (3)
Detector Pilatus4 260k CdTe      PixelSize= 172µm, 172µm         BottomRight (3)
Detector Pilatus4 260kw CdTe     PixelSize= 172µm, 172µm         BottomRight (3)
Detector Pilatus4 2M CdTe        PixelSize= 172µm, 172µm         BottomRight (3)
Detector Pilatus4 4M CdTe        PixelSize= 172µm, 172µm         BottomRight (3)
Detector Pilatus 6M      PixelSize= 172µm, 172µm         BottomRight (3)
Detector Pilatus 900k    PixelSize= 172µm, 172µm         BottomRight (3)
Detector Pilatus CdTe 1M         PixelSize= 172µm, 172µm         BottomRight (3)
Detector Pilatus CdTe 2M         PixelSize= 172µm, 172µm         BottomRight (3)
Detector Pilatus CdTe 300k       PixelSize= 172µm, 172µm         BottomRight (3)
Detector Pilatus CdTe 300kw      PixelSize= 172µm, 172µm         BottomRight (3)
Detector Pilatus CdTe 900kw      PixelSize= 172µm, 172µm         BottomRight (3)
Hexagonal-pixel detector Pixirad-1       Pitch= 6.000e-05 m
Hexagonal-pixel detector Pixirad-2       Pitch= 6.000e-05 m
Hexagonal-pixel detector Pixirad-4       Pitch= 6.000e-05 m
Hexagonal-pixel detector Pixirad-8       Pitch= 6.000e-05 m
Detector Pixium 4700%s   PixelSize= 308µm, 308µm
Detector RapidII         PixelSize= 100µm, 100µm         BottomRight (3)
Detector Picam v1        PixelSize= 1.4µm, 1.4µm         BottomRight (3)
Detector Picam v2        PixelSize= 1.12µm, 1.12µm       BottomRight (3)
Detector Rayonix133      PixelSize= 6.400e-05, 6.400e-05 m       BottomRight (3)
Detector Rayonix LX170   PixelSize= 4.427e-05, 4.427e-05 m       BottomRight (3)
Detector Rayonix LX255   PixelSize= 4.427e-05, 4.427e-05 m       BottomRight (3)
Detector Rayonix MX170   PixelSize= 4.427e-05, 4.427e-05 m       BottomRight (3)
Detector Rayonix MX225   PixelSize= 7.324e-05, 7.324e-05 m       BottomRight (3)
Detector Rayonix MX225HS         PixelSize= 7.813e-05, 7.813e-05 m       BottomRight (3)
Detector Rayonix MX300   PixelSize= 7.324e-05, 7.324e-05 m       BottomRight (3)
Detector Rayonix MX300HS         PixelSize= 7.813e-05, 7.813e-05 m       BottomRight (3)
Detector Rayonix MX325   PixelSize= 7.935e-05, 7.935e-05 m       BottomRight (3)
Detector Rayonix MX340HS         PixelSize= 8.854e-05, 8.854e-05 m       BottomRight (3)
Detector Rayonix MX425HS         PixelSize= 4.427e-05, 4.427e-05 m       BottomRight (3)
Detector Rayonix SX165   PixelSize= 3.950e-05, 3.950e-05 m       BottomRight (3)
Detector Rayonix SX200   PixelSize= 4.800e-05, 4.800e-05 m       BottomRight (3)
Detector Rayonix SX30HS  PixelSize= 1.563e-05, 1.563e-05 m       BottomRight (3)
Detector Rayonix SX85HS  PixelSize= 4.427e-05, 4.427e-05 m       BottomRight (3)
Detector Titan 2k x 2k%s         PixelSize= 60µm, 60µm
Detector Xpad S540 flat  PixelSize= 1.300e-04, 1.300e-04 m       BottomRight (3)(3)
Defining a detector from a spline file#
For optically coupled CCD detectors, the geometrical distortion is often described by a two-dimensional cubic spline (as in FIT2D) which can be imported into the relevant detector instance and used to calculate the actual pixel position in space (and masked pixels).
At the ESRF, mainly FReLoN detectors [J.-C. Labiche, ESRF Newsletter 25, 41 (1996)] are used with spline files describing the distortion of the fiber optic taper.
Let’s download such a file and create a detector from it. Users at ESRF may declare a proxy to connect to the internet.
[2]:
import os
from silx.resources import ExternalResources
downloader = ExternalResources("pyFAI", "http://www.silx.org/pub/pyFAI/testimages", "PYFAI_DATA")
spline_file = downloader.getfile("halfccd.spline")
print(spline_file)
/tmp/pyFAI_testdata_jerome/halfccd.spline
[3]:
hd = pyFAI.detectors.FReLoN(splineFile=spline_file)
print(hd)
print("Shape: %i, %i"% hd.shape)
Detector FReLoN  Spline= /tmp/pyFAI_testdata_jerome/halfccd.spline       PixelSize= 48.42252µm, 46.84483µm       BottomRight (3)
Shape: 1025, 2048
Note: the unusual shape of this detector. This is probably a human error when calibrating the detector distortion in FIT2D.
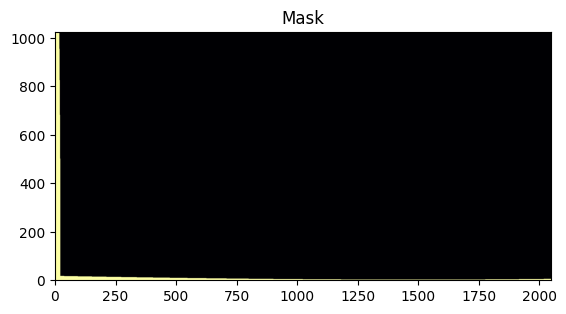
Visualizing the mask#
Every detector object contains a mask attribute, defining pixels which are invalid. For FReLoN detector (a spline-files-defined detectors), all pixels having an offset such that the pixel falls out of the initial detector are considered as invalid.
Masked pixel have non-null values can be displayed like this:
[4]:
# %matplotlib widget
#For documentation purpose, `inline` is used to enforce the storage of the image in the notebook
%matplotlib inline
from matplotlib.pyplot import subplots
from pyFAI.gui import jupyter
[5]:
jupyter.display(hd.mask, label="Mask")
pass
Detector definition files as NeXus files#
Any detector object in pyFAI can be saved into an HDF5 file following the NeXus convention [Könnecke et al., 2015, J. Appl. Cryst. 48, 301-305.]. Detector objects can subsequently be restored from disk, making complex detector definitions less error prone.
[6]:
h5_file = "halfccd.h5"
hd.save(h5_file)
new_det = pyFAI.detector_factory(h5_file)
print(new_det)
print("Mask is the same: ", numpy.allclose(new_det.mask, hd.mask))
print("Pixel positions are the same: ", numpy.allclose(new_det.get_pixel_corners(), hd.get_pixel_corners()))
print("Number of masked pixels", new_det.mask.sum())
FReLoN detector from NeXus file: halfccd.h5     PixelSize= 48.42252µm, 46.84483µm        BottomRight (3)
Mask is the same:  True
Pixel positions are the same:  True
Number of masked pixels 34382
Pixels of an area detector are saved as a four-dimensional dataset: i.e. a two-dimensional array of vertices pointing to every corner of each pixel, generating an array of dimension (Ny, Nx, Nc, 3), where Nx and Ny are the dimensions of the detector, Nc is the number of corners of each pixel, usually four, and the last entry contains the coordinates of the vertex itself (in the order: Z, Y, X).
This kind of definition, while relying on large description files, can address some of the most complex detector layouts. They will be presented a bit later in this tutorial.
[7]:
print("Size of Spline-file:", os.stat(spline_file).st_size)
print("Size of Nexus-file:", os.stat(h5_file).st_size)
Size of Spline-file: 1183
Size of Nexus-file: 43111803
The HDF5 file is indeed much larger than the spline file.
Modify a detector and saving#
One may want to define a new mask (or flat-field) for its detector and save the mask with the detector definition. Here, we create a copy of the detector and reset its mask to enable all pixels in the detector and save the new detector instance into another file.
[8]:
import copy
nomask_file = "nomask.h5"
nomask = copy.deepcopy(new_det)
nomask.mask = numpy.zeros_like(new_det.mask)
nomask.save(nomask_file)
nomask = pyFAI.detector_factory("nomask.h5")
print("No pixels are masked: ",nomask.mask.sum())
No pixels are masked: 0
Wrap up
In this section we have seen how detectors are defined in pyFAI, how they can be created, either from the list of the parametrized ones, or from spline files, or from NeXus detector files. We have also seen how to save and subsequently restore a detector instance, preserving the modifications made.
Distortion correction#
Once the position of every single pixel in space is known, one can benefit from the regridding engine of pyFAI adapted to image distortion correction tasks. The pyFAI.distortion.Distortion class is the equivalent of the pyFAI.AzimuthalIntegrator for distortion. Provided with a detector definition, it enables the correction of a set of images by using the same kind of look-up tables as for azimuthal integration.
[9]:
from pyFAI.distortion import Distortion
dis = Distortion(nomask)
print(dis)
Distortion correction csr on device None for detector shape (1025, 2048):
FReLoN detector from NeXus file: nomask.h5      PixelSize= 48.42252µm, 46.84483µm        BottomRight (3)
FReLoN detector#
First load the image to be corrected, then correct it for geometric distortion.
[10]:
halfccd_img = downloader.getfile("halfccd.edf")
import fabio
raw = fabio.open(halfccd_img).data
cor = dis.correct(raw, dummy=raw.min())

#Then display raw and corrected imagesimages
fig, ax = subplots(2, figsize=(8,8))

jupyter.display(raw, label="Raw Image", ax=ax[0])
jupyter.display(cor, label="Corrected image", ax=ax[1])
pass
WARNING:pyFAI.ext._distortion:Patching image of shape 2048x1024 on expected size of 2048x1025
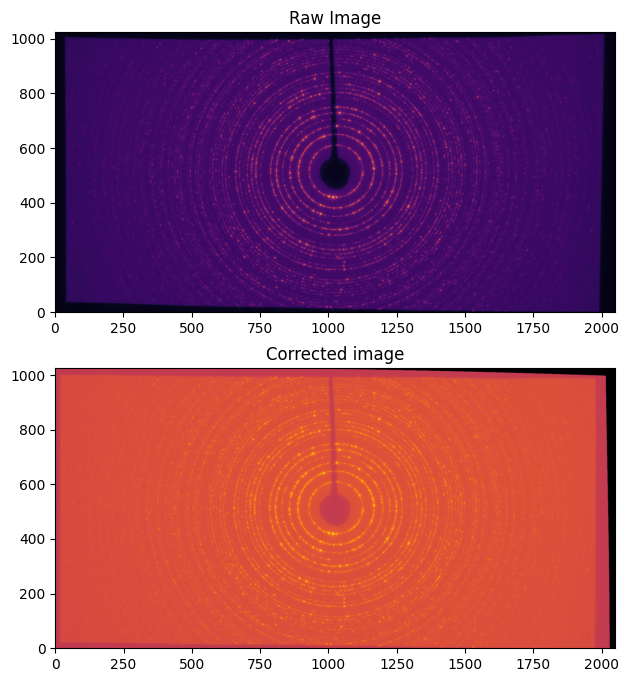
Nota: in this case the image size (1024 lines) does not match the detector’s number of lines (1025) hence pyFAI complains about it. Here, pyFAI patched the image on an empty image of the right size so that the processing can occur.
In this example, the size of the pixels and the shape of the detector are preserved, discarding all pixels falling outside the detector’s grid.
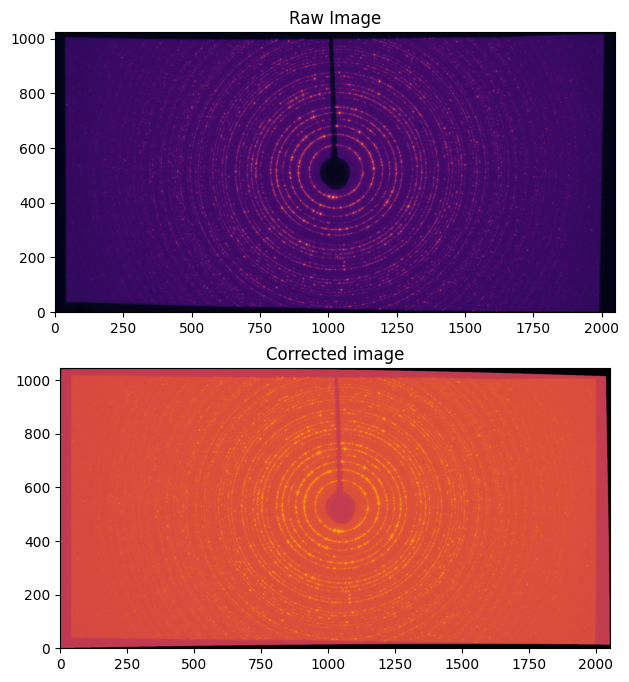
One may want all pixels’ intensity to be preserved in the transformation. By allowing the output array to be large enough to accomodate all pixels, the total intensity can be kept. For this, just enable the “resize” option in the constructor of Distortion:
[11]:
dis1 = Distortion(hd, resize=True)
cor = dis1.correct(raw)
print(dis1)
print("After correction, the image has a different shape", cor.shape)
WARNING:pyFAI.ext._distortion:Patching image of shape 2048x1024 on expected size of 2048x1025
Distortion correction csr on device None for detector shape (1045, 2052):
Detector FReLoN  Spline= /tmp/pyFAI_testdata_jerome/halfccd.spline       PixelSize= 48.42252µm, 46.84483µm       BottomRight (3)
After correction, the image has a different shape (1045, 2052)
[12]:
fig, ax = subplots(2,figsize=(8,8))
jupyter.display(raw, label="Raw Image", ax=ax[0])
jupyter.display(cor, label="Corrected image", ax=ax[1])
pass
Example of Pixel-detectors:#
XPad Flat detector#
There is a striking example in the cover image of this article: http://scripts.iucr.org/cgi-bin/paper?S1600576715004306 where a detector made of multiple modules is eating up some rings. The first example will be about the regeneration of an “eyes friendly” version of this image.
[13]:
xpad_file = downloader.getfile("LaB6_18.57keV_frame_13.edf")
xpad = pyFAI.detector_factory("Xpad_flat")
print(xpad)
xpad_dis = Distortion(xpad, resize=True)

raw = fabio.open(xpad_file).data
cor = xpad_dis.correct(raw)
print("Shape as input and output:", raw.shape, cor.shape)
print("Conservation of the total intensity:", raw.sum(dtype="float64"), cor.sum(dtype="float64"))

#then display images side by side
fig, ax = subplots(1, 2, figsize=(8,8))
jupyter.display(raw, label="Raw Image", ax=ax[0])
jupyter.display(cor, label="Corrected image", ax=ax[1])
pass
Detector Xpad S540 flat  PixelSize= 1.300e-04, 1.300e-04 m       BottomRight (3)(3)
Shape as input and output: (960, 560) (1153, 578)
Conservation of the total intensity: 11120798.0 11120797.978917753

WOS XPad detector#
This is a new WAXS opened for SAXS pixel detector from ImXPad (available at ESRF-BM02/D2AM CRG beamline). It looks like two of XPad_flat detectors side by side with some modules shifted in order to create a hole to accomodate a flight-tube which gathers the SAXS photons to a second detector further away.
The detector definition for this specific detector has directly been put down using the metrology informations from the manufacturer and saved as a NeXus detector definition file.
[14]:
wos_det = downloader.getfile("WOS.h5")
wos_img = downloader.getfile("WOS.edf")
wos = pyFAI.detector_factory(wos_det)
print(wos)
wos_dis = Distortion(wos, resize=True)

raw = fabio.open(wos_img).data
cor = wos_dis.correct(raw)
print("Shape as input: %s and output: %s"%( raw.shape, cor.shape))
print("Conservation of the total intensity: %.4e vs %.4e "%(raw.sum(dtype="float64"), cor.sum(dtype="float64")))
#then display images side by side
fig, ax = subplots(2, figsize=(8,8))
jupyter.display(raw, label="Raw Image", ax=ax[0])
jupyter.display(cor, label="Corrected image", ax=ax[1])
pass
NexusDetector detector from NeXus file: /tmp/pyFAI_testdata_jerome/WOS.h5       PixelSize= 130µm, 130µm  BottomRight (3)
Shape as input: (598, 1154) and output: (710, 1302)
Conservation of the total intensity: 4.4436e+08 vs 4.4437e+08
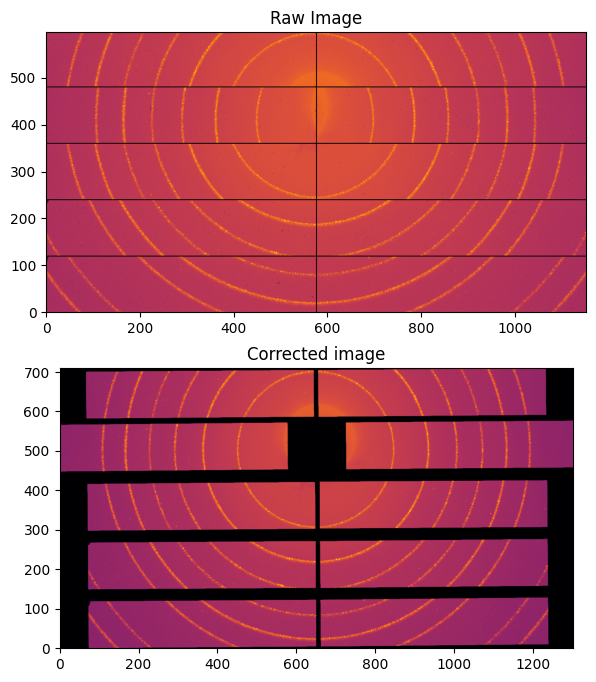
Nota: Do not use this detector definition file to process data from the WOS@D2AM as it has not (yet) been fully validated and may contain some errors in the pixel positioning.
Conclusion#
PyFAI provides a very comprehensive list of detector definitions, is versatile enough to address most area detectors on the market, and features a powerful regridding engine, both combined together into the distortion correction tool which ensures the conservation of the signal during the transformation (the number of photons counted is preserved during the transformation)
Distortion correction should not be used for pre-processing images prior to azimuthal integration as it re-bins the image, thus induces a broadening of the peaks. The AzimuthalIntegrator object performs all this together with integration, it has hence a better precision.
This tutorial did not answer the question how to calibrate the distortion of a given detector ? which is addressed in another tutorial called detector calibration.
[15]:
print(f"Total execution time: {time.perf_counter() - start_time:.3f} s")
Total execution time: 13.134 s