Main Window
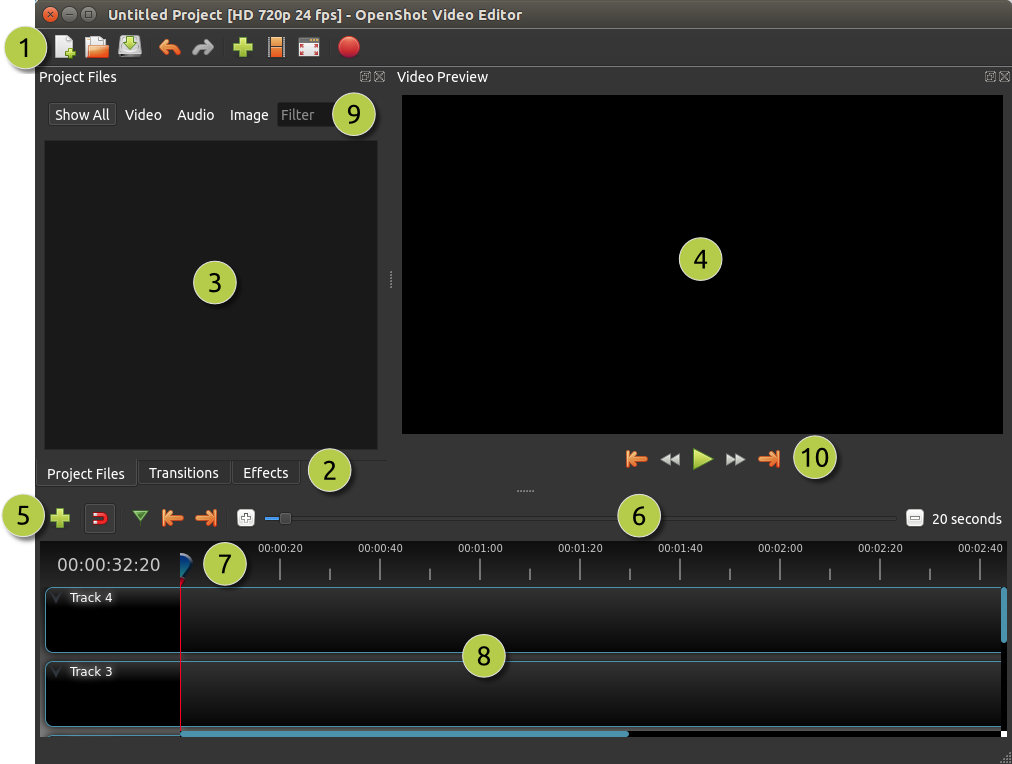
OpenShot Video Editor has one main window which contains most of the information, buttons, and menus needed to edit your video project.
Overview
# |
Name |
Description |
|---|---|---|
1 |
Main Toolbar |
Contains buttons to open, save, and export your video project. |
2 |
Function Tabs |
Switch between Project Files, Transitions, Effects, and Emojis. |
3 |
Project Files |
All audio, video, and image files that have been imported into your project. |
4 |
Preview Window |
This is the area that the video will playback on the screen. |
5 |
Edit Toolbar |
This toolbar contains buttons used for snapping, inserting markers, slicing razor, and jumping between markers. |
6 |
Zoom Slider |
This slider will adjust the time-scale of your timeline. Drag the left or right edge to zoom in or out. Drag the blue area to scroll the timeline left or right. Clips and transitions are displayed as simple rectangles, to give you context for adjusting the zoom to specific clips. |
7 |
Play-head / Ruler |
The ruler shows the time-scale, and the red line is the play-head. The play-head represents the current playback position. Hold Shift key while dragging the playhead to snap to nearby clips. |
8 |
Timeline |
The timeline visualizes your video project, and each clip and transition in your project. You can drag the mouse to select, move, or delete multiple items. |
9 |
Filter |
Filter the list of items shown (project files, transitions, effects, and emojis) by using these buttons and filter textbox. Enter a few letters of what you are looking for, and the results will be shown. |
10 |
Playback |
Left to Right: Jump to Start, Rewind, Play/Pause, Fast Forward, and Jump to End |
For step-by-step instructions on the basic usage of OpenShot, be sure to read the Quick Tutorial.
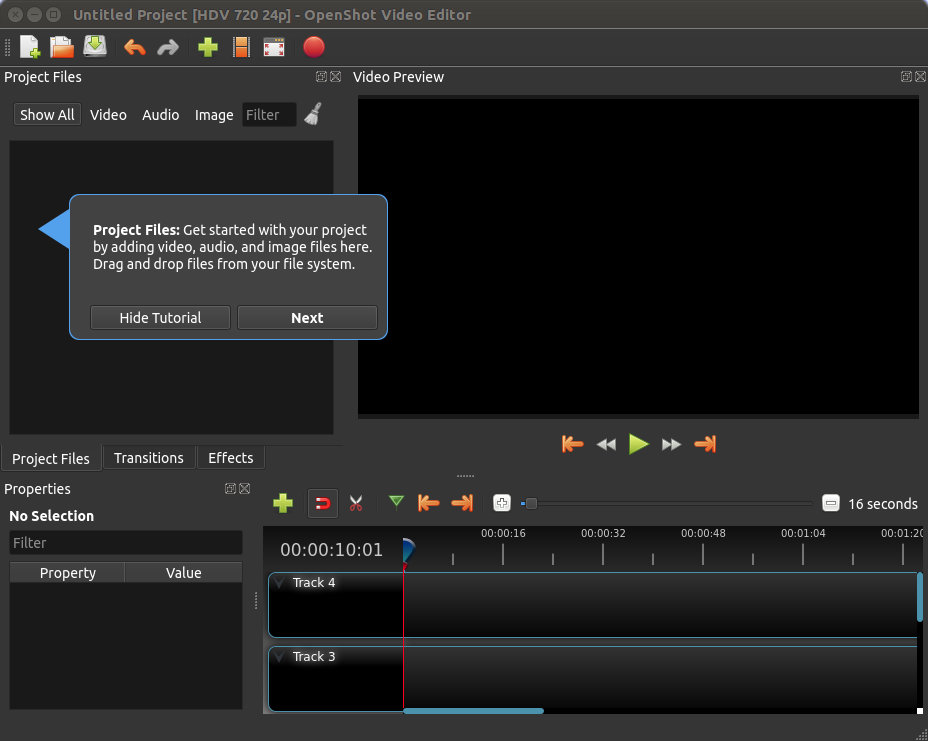
Built-in Tutorial
When you first launch OpenShot, you will be presented with a friendly built-in tutorial. It will demonstrate and explain the basics. Clicking Next will jump to the next topic. You can always view this tutorial again from the Help→Tutorial menu.
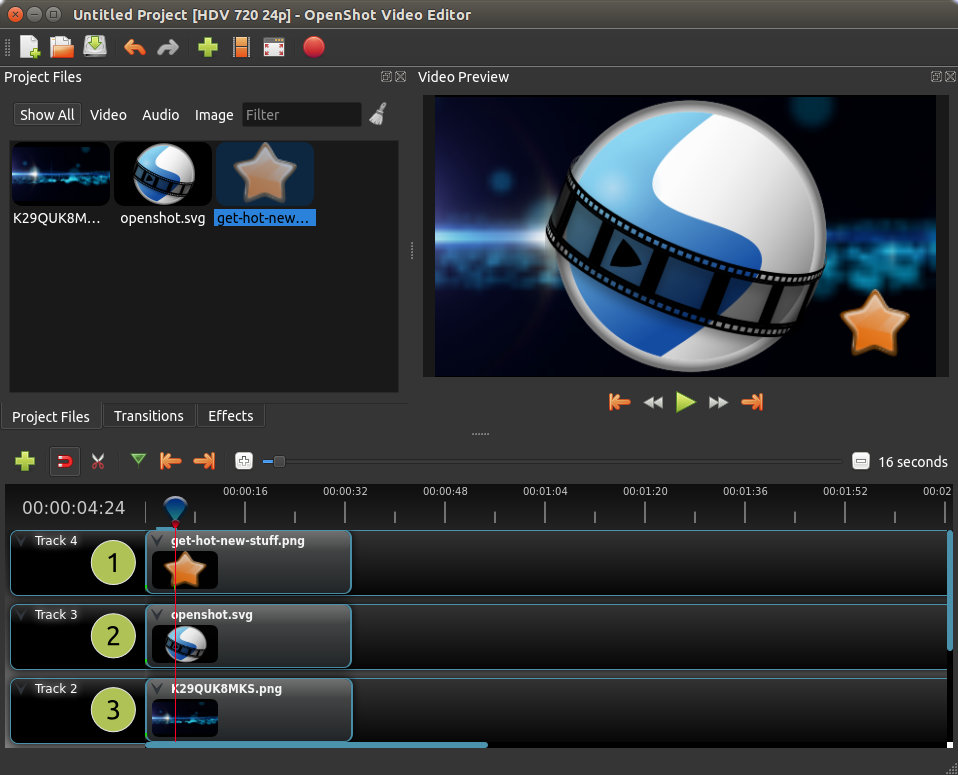
Tracks & Layers
OpenShot uses tracks to layer videos and images. The top most track is the top layer, and the bottom track is the bottom layer. If you are familiar with layers in a photo editing application, then you should be quite familiar with this concept. OpenShot will stack the layers and mix each one together, just like a photo editing application. You can have an unlimited number of tracks, but typically a simple video project will not need more than 5 tracks.
For example, imagine a 3 track video project
# |
Name |
Description |
|---|---|---|
1 |
Top Track |
Clips on this track will always be on top and visible. Often watermarks and titles are placed on higher tracks. |
2 |
Middle Track |
Clips in the middle (might or might not be visible, depending on what is above them) |
3 |
Bottom Track |
Clips on this track will always be on the bottom. Often audio clips are placed on lower tracks. |
Keyboard Shortcuts
Here is a list of the default keyboard shortcuts supported by OpenShot. You can configure these shortcuts in the Preferences window, which is opened by selecting Edit→Preferences from the OpenShot menu bar. (On macOS, choose OpenShot Video Editor→Preferences.) Learning a few of these shortcuts can save you a bunch of time!
Shortcut |
Action |
|---|---|
Ctrl+H |
About OpenShot |
Ctrl+M |
Add Marker |
Ctrl+Shift+T |
Add Track |
Ctrl+W |
Add to Timeline |
Ctrl+B |
Animated Title |
Ctrl+Up |
Center on Playhead |
Ctrl+P |
Choose Profile |
Ctrl+Shift+ESC |
Clear All Cache |
Ctrl+C |
Copy |
Delete |
Delete Item |
Backspace |
Delete Item (Alternate 1) |
Ctrl+D |
Details View |
Ctrl+Shift+C |
Duplicate Title |
Not Set |
Edit Title |
Ctrl+E |
Export Video |
L |
Fast Forward |
F11 |
Fullscreen |
Ctrl+F |
Import Files… |
Ctrl+Shift+E |
Insert Keyframe |
Ctrl+End |
Jump To End |
Ctrl+Home |
Jump To Start |
Ctrl+N |
New Project |
Right |
Next Frame |
Ctrl+Right |
Next Marker |
Shift+Left |
Nudge left |
Shift+Right |
Nudge right |
Ctrl+O |
Open Project… |
Ctrl+V |
Paste |
Space |
Play/Pause Toggle |
Up |
Play/Pause Toggle (Alternate 1) |
Down |
Play/Pause Toggle (Alternate 2) |
K |
Play/Pause Toggle (Alternate 3) |
Ctrl+Shift+P |
Preferences |
Left |
Previous Frame |
Ctrl+Left |
Previous Marker |
Ctrl+I |
Properties |
Ctrl+Q |
Quit |
Ctrl+Y |
Redo |
J |
Rewind |
Not Set |
Save Current Frame |
Ctrl+S |
Save Project |
Ctrl+Shift+S |
Save Project As… |
Ctrl+A |
Select All |
Ctrl+Shift+A |
Select None |
Ctrl+K |
Slice All: Keep Both Sides |
Ctrl+L |
Slice All: Keep Left Side |
Ctrl+J |
Slice All: Keep Right Side |
s |
Slice Selected: Keep Both Sides |
d |
Slice Selected: Keep Left Side |
a |
Slice Selected: Keep Right Side |
Ctrl+G |
Snapping Enabled |
Ctrl+X |
Split Clip… |
Ctrl+Shift+D |
Thumbnail View |
Ctrl+T |
Title |
R |
Toggle Razor |
Ctrl+R |
Transform |
Ctrl+Z |
Undo |
= |
Zoom In |
- |
Zoom Out |
Ctrl+Middle Button |
Scroll Timeline |