Clips
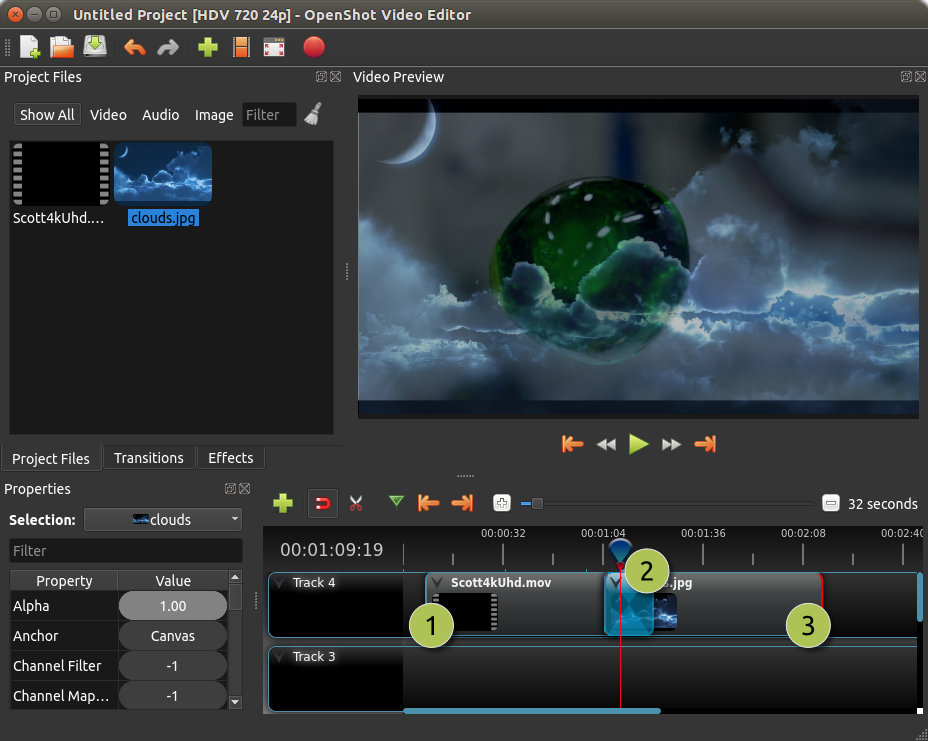
Each media file you add to the OpenShot timeline is called a clip and is visualized by a dark, rounded rectangle (as seen in the screenshot below). A clip has many properties, which affect how and when the clip is rendered and composited, such as position, layer, scale, location, rotation, and alpha. OpenShot can animate these properties over time, and when combined, can create some amazing effects.
To display a clip’s properties, either right-click and choose Properties or
double click on the clip. Clip properties appear in the properties dock, in
alphabetical order. These properties can be filtered by typing a few letters
in the filter box, at the top of the property panel.
To adjust a property, you can:
click on its value and drag the slider from side to side for a coarse adjustment
double click on its value and enter a value. Numerical values display to 2 decimal places, but you can enter more precise numbers. You can often enter valid values that are outside the range offered by the slider adjustment.
right-click or double-click to select an option (for non-numerical values)
Clip properties are part of the Animation system. If you change a clip property, you create a keyframe at the current position of the playhead. If you want a property to apply throughout the clip, you must place the playhead at (or before) the start of the clip before making the change. An easy way to locate the start of a clip is to use ‘next/previous marker’ on the Timeline toolbar.
# |
Name |
Description |
|---|---|---|
1 |
Clip 1 |
A video clip |
2 |
Transition |
A gradual fade transition between the 2 clips |
3 |
Clip 2 |
An image clip |
Trimming & Slicing
OpenShot has many easy ways to adjust the start and end trim positions of a clip (otherwise known as trimming). The most common method is simply clicking and dragging the left (or right) edge of the clip. Here is a list of all methods for cutting or trimming clips in OpenShot:
Keep in mind that the above cutting methods also have Keyboard Shortcuts, to save even more time.
Preset Menu
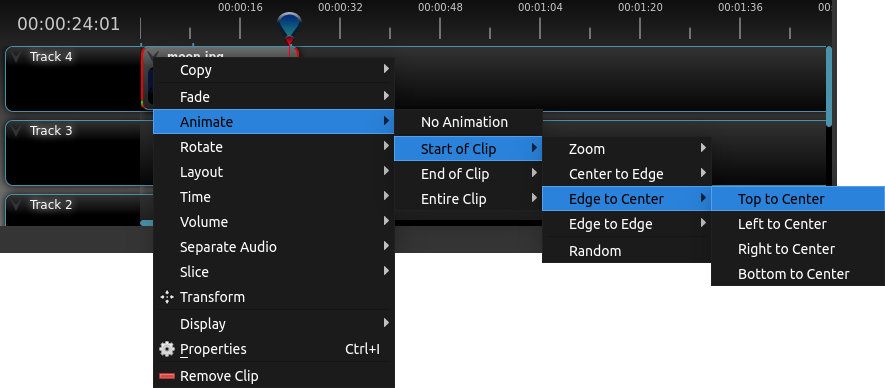
OpenShot has tons of great preset animations and clip properties, such as fading, sliding, zooming, etc… These presets can be accessed by right clicking on a clip.
Transform
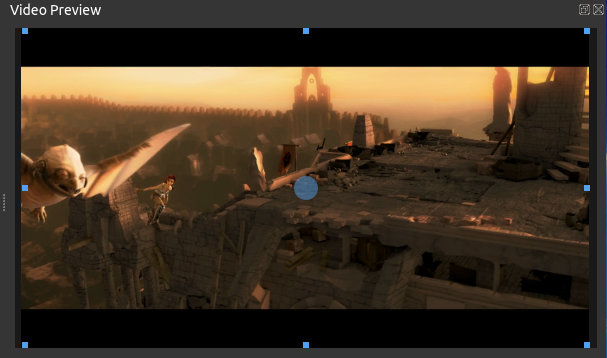
To quickly adjust the location, scale, rotation, and shear of a clip, select a clip on the timeline. By default, the selected clip appears in the preview window with transform controls (blue lines and squares). Or if disabled, right click on a clip and choose Transform. Dragging the blue squares will adjust scale, and dragging the center will move the image. Dragging the mouse on the outside of the blue lines will rotate the image. Dragging along the blue lines will shear the image in that direction. Dragging the circle in the middle will move the origin point that controls where we rotate the image. Note: Pay close attention to the play-head position (red playback line). Key frames are automatically created at the current playback position, to help create animations.
For more info on key frames and animation, see Animation.
Effects
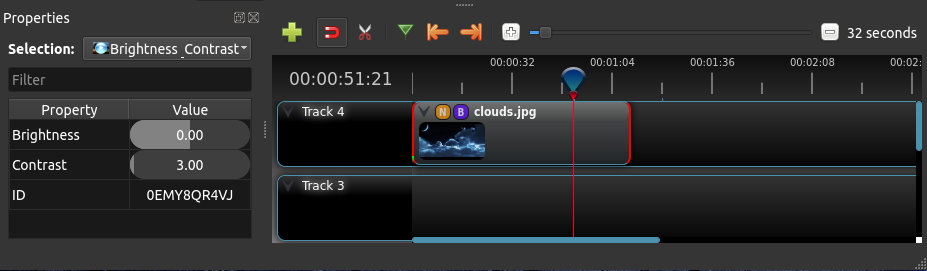
In addition to the many clip properties which can be animated and adjusted, you can also drop an effect directly onto a clip. Each effect is represented by a small letter icon. Clicking the effect icon will populate the properties of that effect, and allow you to edit (and animate) them. For the full list of effects, see Effects.
Properties
Below is a list of clip properties which can be edited, and in most cases, animated over time. To view a clip’s properties, right click and choose Properties. The property editor will appear, where you can change these properties. Note: Pay close attention to where the play-head (i.e. red playback line) is. Key frames are automatically created at the current playback position, to help create animations.
Name |
Description |
|---|---|
Alpha |
Curve representing the alpha (1 to 0) |
Channel Filter |
A number representing an audio channel to filter (clears all other channels) |
Channel Mapping |
A number representing an audio channel to output (only works when filtering a channel) |
Frame Number |
The format to display the frame number (if any) |
Duration |
The length of the clip (in seconds) |
End |
The end trimming position of the clip (in seconds) |
Gravity |
The gravity of a clip determines where it snaps to its parent (details below) |
Enable Audio |
An optional override to determine if this clip has audio (-1=undefined, 0=no, 1=yes) |
Enable Video |
An optional override to determine if this clip has video (-1=undefined, 0=no, 1=yes) |
ID |
A randomly generated GUID (globally unique identifier) assigned to each clip |
Track |
The layer which holds the clip (higher tracks are rendered on top of lower tracks) |
Location X |
Curve representing the relative X position in percent based on the gravity (-1 to 1) |
Location Y |
Curve representing the relative Y position in percent based on the gravity (-1 to 1) |
Volume Mixing |
The volume mixing choices control how volume is adjusted before mixing (None=don’t adjust volume of this clip, Reduce=lower the volume to 80%, Average=divide volume based on # of concurrent clips, details below) |
Origin X |
Curve representing the rotation origin point, X position in percent (-1 to 1) |
Origin Y |
Curve representing the rotation origin point, Y position in percent (-1 to 1) |
Parent |
The parent object to this clip, which makes many of these keyframe values initialize to the parent value |
Position |
The position of the clip on the timeline (in seconds, 0.0 is the beginning of the timeline) |
Rotation |
Curve representing the rotation (0 to 360) |
Scale |
The scale determines how a clip should be resized to fit its parent (details below) |
Scale X |
Curve representing the horizontal scaling in percent (0 to 1) |
Scale Y |
Curve representing the vertical scaling in percent (0 to 1) |
Shear X |
Curve representing X shear angle in degrees (-45.0=left, 45.0=right) |
Shear Y |
Curve representing Y shear angle in degrees (-45.0=down, 45.0=up) |
Start |
The start trimming position of the clip (in seconds) |
Time |
Curve representing the frames over time to play (used for speed and direction of video) |
Volume |
Curve representing the volume (0 to 1) |
Wave Color |
Curve representing the color of the audio wave form |
Waveform |
Should a waveform be used instead of the clip’s image |
Details
Gravity:
Gravity sets an initial position for the clip, once it has been scaled as above. The options are:
Top Left – the top and left edges of the clip align with the top and left edges of the screen
Top Center – the top edge of the clip aligns with the top edge of the screen; the clip is horizontally centered on the screen.
Top Right – the top and right edges of the clip align with the top and right edges of the screen
Left – the left edge of the clip aligns with the left edge of the screen; the clip is vertically centered on the screen.
Center (default) – the clip is centered horizontally and vertically on the screen.
Right – the right edge of the clip aligns with the right edge of the screen; the clip is vertically centered on the screen.
Bottom Left – the bottom and left edges of the clip align with the bottom and left edges of the screen
Bottom Center – the bottom edge of the clip aligns with the bottom edge of the screen; the clip is horizontally centered on the screen.
Bottom Right – the bottom and right edges of the clip align with the bottom and right edges of the screen
Scale:
This is the initial resizing method, which may be further adjusted by Scale X and Scale Y (below). The options are:
Best Fit (default) – the clip is as large as possible without changing the aspect ratio.
Crop – the aspect ratio of the clip is maintained while the clip is enlarged to fill the entire screen, even if that means some of it will be cropped.
None – the clip is its original size.
Stretch – the clip is stretched to fill the entire screen, changing the aspect ratio if necessary.
Volume Mixing:
Mixing audio involves adjusting volume levels so that they maintain a good range within each clip, and then adjusting them in proportion to other clips used in the project. The following values are available:
None - Make no adjustments to volume data before mixing audio
Average - Automatically divide the volume of each clip based on the # of overlapping clips. For example, 2 overlapping clips would each have 50% volume.
Reduce - Automatically reduce the clip’s volume by 20%, allowing it to mix with other clips, and reducing the likelihood of over-volume loud events.
Consider the following guidelines when adjusting volume levels:
If you combine particularly loud audio clips on multiple tracks, clipping (a staccato distortion) may occur. To avoid clipping, reduce volume levels.
If you need to adjust the volume separately in different parts of a clip (for example, one person’s voice is faint, while later another’s is too loud), you can use keyframes to vary the volume throughout the clip.
If the original level of a clip is much too high or low, you can change the input level. However, adjusting the level will not remove any distortion that may have resulted from recording the clip too high. In those cases, it is best to re-record the clip.
More Information
For more info on key frames and animation, see Animation.