|
|

Creating and using fonts
ClanLib makes it possible to create your own font in an image file or use existing system fonts. You can then use the fonts to display text to the player, such as FPS counters, dialog boxes, and other such information. ClanLib gives you a great deal of control over how your text is displayed.
Creating fonts
You can make your own font by drawing all the glyphs (or character images) in an image file. Once that is done, you must tell ClanLib how to separate the file into individual glyphs. The easiest way to do this is to use alpha-cutting. To create an alpha-cut font, open up your favorite image editor, and create a wide, short, transparent image:

Then type a long string of characters, which will become the characters in your font. Usually this string will look something like this:

The example set of character glyphs above isn't very useful: usually, you will want to include at least the entire alphabet, probably in upper and lower case, all the numbers, and quite a few of the symbols. However, you do not have to, and in some cases, you won't want to. For example, an LCD numerals font might only include 0-9 and the colon.
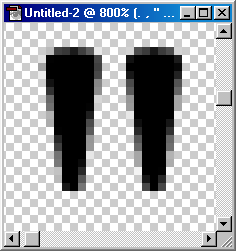
Once you've typed the string in, you must clean up the image to make certain that there's at least one column of transparency between each character. A common problem is the double-quote character: you may need to add a slightly-visible pixel between the two quote marks to make ClanLib treat it as a single character. Here's a before and after example:

ClanLib uses the same mechanism to load bitmap font glyphs as it does to separate the frames of a sprite from a single file. In fact, a CL_Sprite is used for bitmap fonts: you can use any sprite creation method to create the glyphs of a font, including palette-cutting, grid-cutting, storing glyphs in individual files, or any combination of the above. See the sprites overview for more information.
Font resources
You should probably already have a resource file or two as part of your game; if you don't, then you're missing out on a lot of flexibility. See the resource overview for more info.
You will need two resources: one for the sprite containing all the glyphs, and one for the font itself. The only one you use directly is the font resource.
Assuming you'd like to create a font called FontA based on an alpha-cut image called font_a.tga, containing the glyphs in the visual example above, your should have some entries in your resources file that look like this:
<sprite name="Font_glyphs"> <image file="font.tga"><alpha /></image> </sprite> <font name="Font"> <bitmap glyphs="Font_glyphs" letters="AaBb1234.,"" /> </font>
The following options for sprite-based font resources are supported:
- glyphs : Required. The name of the resource of the sprite to extract glyphs from.
- letters : Required. The ASCII characters that are in the font, in the same order as they appear in the sprite.
- spacelen : The width, in pixels, of a space. If this value is unspecified, it will use the average of the font's glyph widths.
- monospace : If non-zero, causes all glyphs in the font to seem to be the width of the widest glyph. This results in a typewriter-like font.
You can also use resources for system fonts, with the following options:
- font : Required. The name of the system font to use. What this precisely means depends on how your OS's font interface works.
- height : Required. The requested height of the font in pixels. What this means depends on how the OS's font interface works.
- width : The requested width of the font in pixels. If unspecified, attempts to find the best matching width for the given height. Again, what this means is dependent upon the details of the OS's font interface.
- letters : The ASCII characters that should be in the font; if unspecified, it will put in all the characters it can find in the font.
- bold : If non-zero, requests bold text.
- italic : If non-zero, requests italic text.
- underline : If non-zero, requests underlined text.
- strikeout : If non-zero, requests text with a horizontal line through the middle of the glyphs.
And these options work for both sprite-based and system fonts:
- width_offset : This is used to apply an offset to the widths of all glyphs. You can set this to a negative value to kern characters together (this may be useful, for example, for italic fonts), or positive to spread characters apart. You can always change this value afterwards using CL_Font::set_width_offset.
- height_offset : This is an offset applied to the height of the font. ClanLib uses the height of the tallest glyph to determine the height of the line: you can use this option to give it a positive offset, spreading lines apart, or a negative offset, merging lines together. You can always change this afterwards using CL_Font::set_height_offset.
- delims : This string of characters is what separates words from each other when word wrapping. Do not include the newline character here, since that is implicitly a delimiter. By default, the only delimiter is the space.
Using fonts
If your resources file was named 'resources.xml', then you can load the font into your program from the resource using the following C++ code:
  CL_ResourceManager manager("resources.xml");
  CL_Font font_a("Font_A", &manager);
Once you've done that, you can call CL_Font::draw(int, int, std::string) to print arbitrary text. For example:
  font_a.draw(150, 150,
  	"How many boards would the Mongols hoard,"
	" if the Mongol hordes got bored?\n"
	"  --Calvin and Hobbes");
You can also print into a CL_Rect using CL_Font::draw(CL_Rect, std::string). If you do this, the text will be word-wrapped to the width of the rectangle, and will not exceed the rectangle's height:
  CL_Rect bounds_rect(50, 50, 300, 350);
  font_a.draw(bounds_rect,
  	"Gau: There's treasure! It's shiny, shiny, shiny shiny shiny!\n"
	"Sabin: Could anything be that shiny?"
	);
CL_TextStyler
CL_TextStyler is a class which contains one or more CL_Fonts. You can then use a CL_TextStyler to draw strings with various effects (scaling, justification, etc), and to change between fonts mid-string.
CL_TextStyler keeps track of the fonts it contains by naming them with strings. Every CL_TextStyler should have a font named "default", which is used when no particular font is explicitly specified. You can name any other fonts in the CL_TextStyler whatever you like.
You can create a working CL_TextStyler by using its default constructor, then using the add_font() method to copy fonts in:
CL_TextStyler ts;
ts.add_font("default", some_font);
ts.add_font("bold", another_font);
It's also possible to keep CL_TextStylers in your resource files. Here's the same CL_TextStyler as above, in resource form, assuming that some_font and another_font are in the resource file:
<text_styler name="ts">
<font name="default" font="some_font" />
<font name="bold" font="another_font" />
</text_styler>
Using CL_TextStyler
CL_TextStyler's interface is almost identical to CL_Font's. The main difference is in the strings you pass, which can contain curly-bracketed tags to change the font:
ts.draw(0, 0, "This text is in the default font. {bold}And this text is in another font.{/bold} Narf!");
To draw a "{" character without starting a tag, you can simply put two in a row, which is escaped to mean a single left curly-bracket (right curly-brackets don't need need to be escaped):
ts.draw(0, 0, "This {{ is a left curly brace. Only one of them will appear in the actual output.");
You can also use square-bracket tags that change the justification, color, or scale, or insert newlines:
ts.draw(0, 0,
	"This is a line that's at regular scale and is left justified.\n"
	"[c red]Red[/c][c 0 255 0]Blue[/c][c 0 0 255 170]Green (slightly transparent)[/c].\n"
	"[s 2.0][j center]Here's a line that's center justified and double-sized.\n"
	"[s 2.0][j right]Here's a line that's quadruple-sized (2.0x2.0) and right justified.\n"
	"[/j][/j][/s][/s]This line is back at regular size and left justification.\n"
	"This text is on it's line.[n]This text is on a different line.[n]"
	"There's no difference between using 'n' tags and regular ASCII newlines.\n"
	"[[ Here is a literal left square bracket; only one will appear in the actual output.\n"
);
The above example also demonstrates a handy little C trick: literal strings that appear next to each other will be attached together into a single string by the compiler.
CL_GlyphBuffer
For unusual text effects, you can use a CL_GlyphBuffer to alter the details of CL_Font's or CL_TextStyler's output before it is drawn to the screen. CL_Font and CL_TextStyler both have draw_to_gb() methods, which you can use to send glyph information to a CL_GlyphBuffer instead of the display. Then, you can modify the CL_GlyphBuffer's various data structures, and use the CL_GlyphBuffer's draw() method to display your post-edited text. For example, you can use CL_GlyphBuffer to change justification:
CL_GlyphBuffer gb;
some_font.draw_to_gb("Eat\nFlaming\nDeath!", gb);
gb.justify_center(); //Applies to all text in the buffer by default
gb.draw(0,0); //Draws the upper left corner of the text bounding box at given pos
You can also use the draw_to_gb() functions several times in a row with different text and/or fonts, which causes the text to be combined in the same way that CL_TextStyler combines text from several fonts. For example, to duplicate the first CL_TextStyler example above using only CL_Fonts and CL_GlyphBuffer:
CL_GlyphBuffer gb;
some_font.draw_to_gb("This text is in the default font. ", gb);
another_font.draw_to_gb("And this text is in another font.", gb);
some_font.draw_to_gb("Narf!", gb);
gb.draw(0, 0);
Editing operations on a CL_GlyphBuffer have to occur in a specific order, with any number of calls to either or both of CL_Font::draw_to_gb() or CL_TextStyler::draw_to_gb() first, any number of calls to CL_GlyphBuffer's justification methods second, and any manual modification of the CL_GlyphBuffer's contents last. You can skip past any of these steps, but you cannot go backwards in the list unless you clear the CL_GlyphBuffer and start over again from scratch.